
PX University is a Joomla 6 template for colleges, universities and independent schools, built on the T4 Framework. This guide takes you from installation to a finished site: template styles, T4 settings, module positions and the PX Content blocks behind every section.
Overview
PX University comes with the full demo site of Aldermere College: a home page, about, academics, six school pages, admissions, research, campus life, news and events. Every section of these pages is a module you can edit in the administrator.
- 4 template styles for the home page, inner pages, full-width pages and landing pages.
- T4 Framework: logo, fonts, colours, megamenu and layouts from one settings screen with a live preview.
- PX Content module with 19 block types (hero, statistics, timeline, testimonials, steps, fees, people and more), each with its own settings.
- 9 article list layouts for news, events, feature stories and programme cards.
- Light and dark mode from the start.
What you download:
| Package | Use it when |
|---|---|
| Quickstart | You start a new site. It installs Joomla, the template, all extensions and the demo content in one go. |
| Template | You add PX University to a site you already have. |
| PX Content module | Needed with the template package; already included in the quickstart. |
| T4 Framework plugin | Needed with the template package; already included in the quickstart. |
Installation
System requirement
- Joomla 6.x
- PHP 8.3 or later
- MySQL 8.0.13+ or MariaDB 10.4+
- Apache 2.4+ or Nginx 1.21+
Install the quickstart
The quickstart is the easiest way to get a site that looks exactly like the demo.
- Download the PX University Quickstart from your account on thepixel.dev.
- Create an empty database and a database user on your hosting.
- Upload the zip to your server (the folder where the site will live) and extract it.
- Open your domain in the browser. The Joomla installer starts.
- Fill in the site name, your admin account and the database details, then click Install Joomla.
- When the installer finishes, click Remove "installation" folder.
The quickstart already contains the T4 Framework, the PX Content module and all demo content. You do not need to install anything else.
Install on an existing site
Install the packages in this order through System » Install » Extensions » Upload Package File:
- T4 Framework plugin (the template needs it to run).
- PX University template.
- PX Content module.
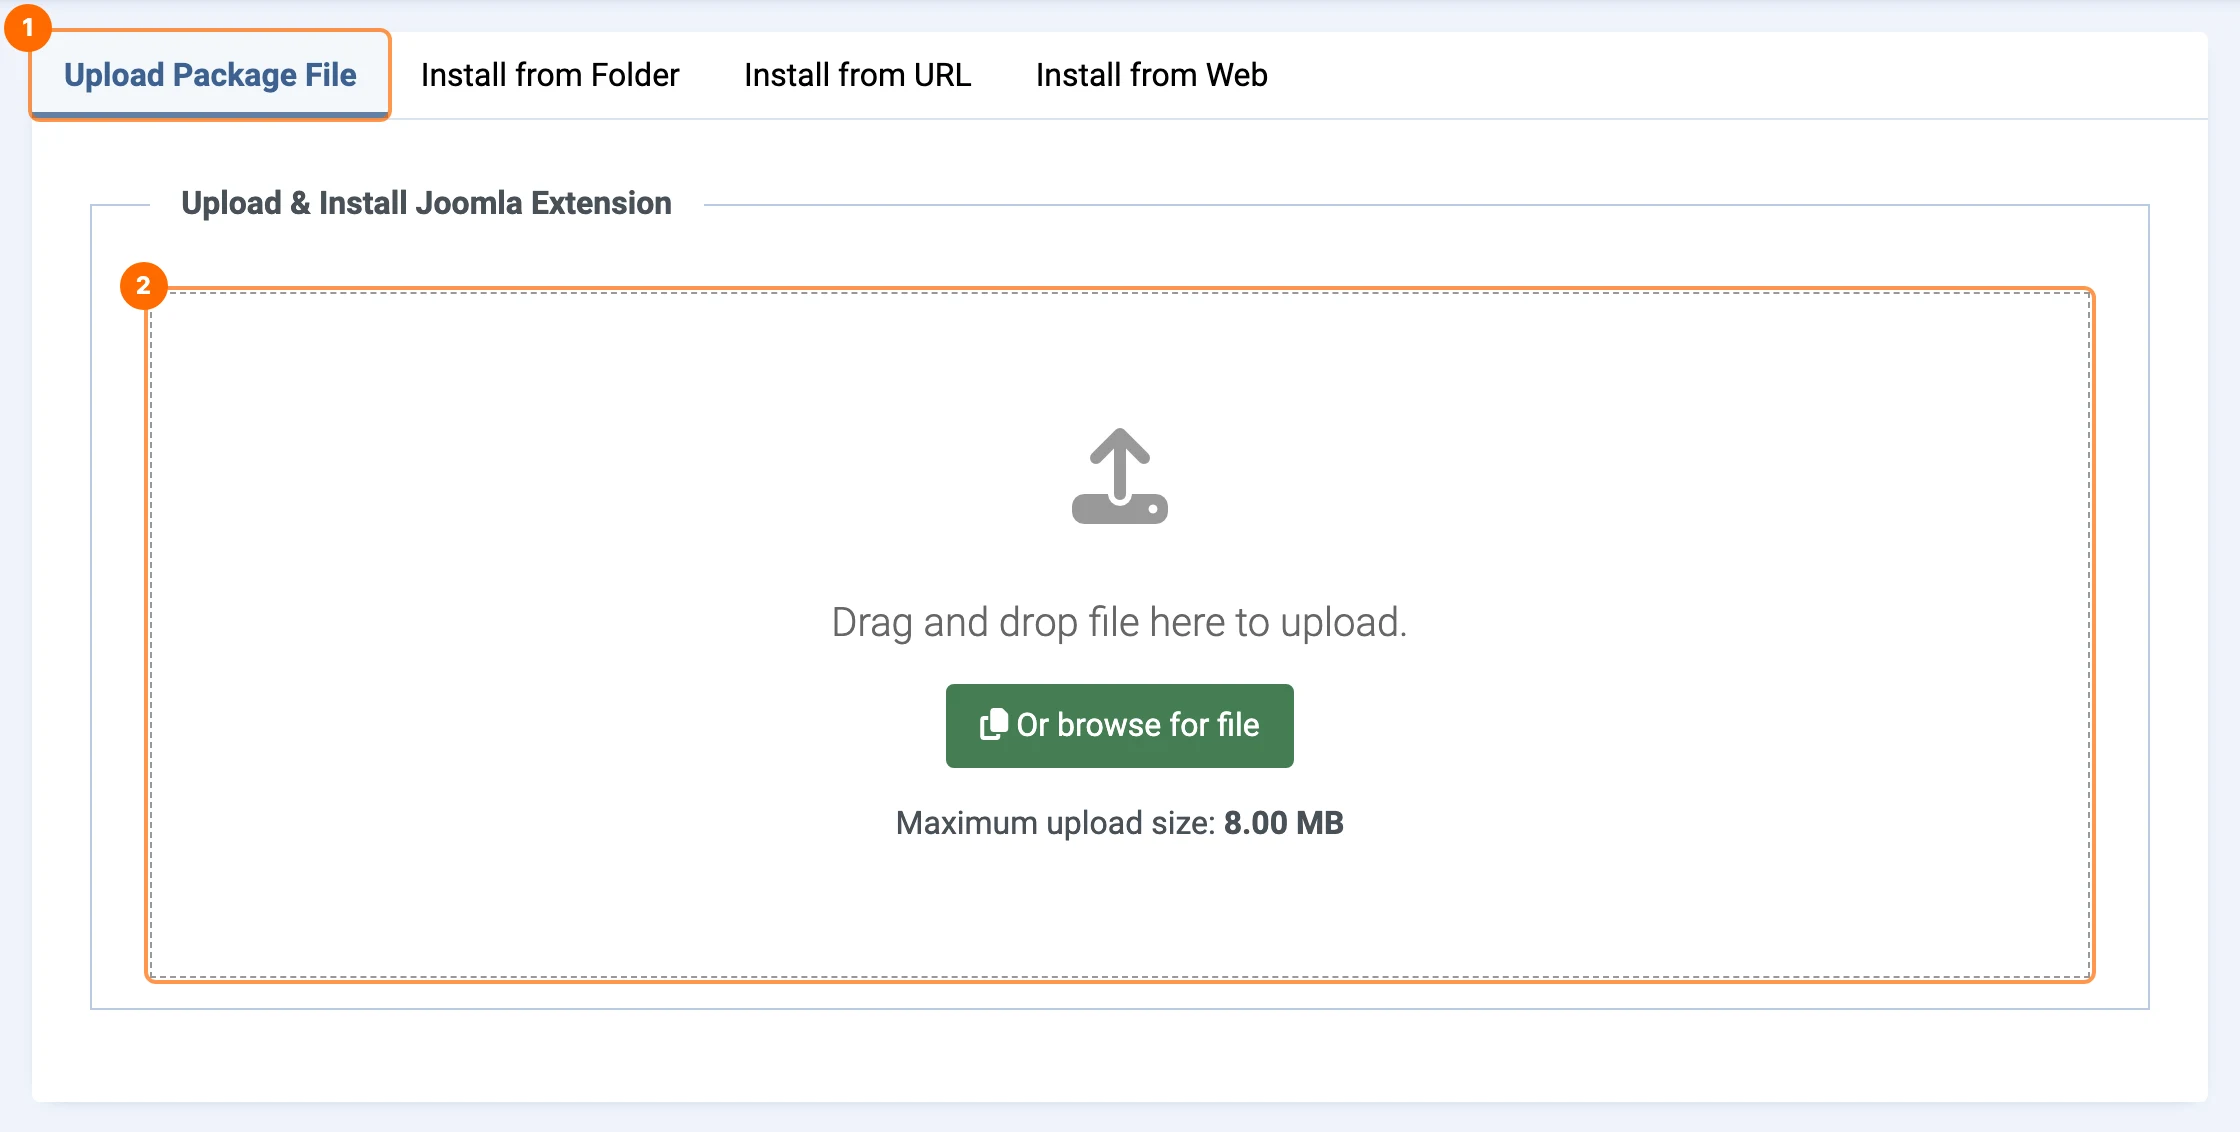
A manual install gives you the template and its styles, but not the demo pages and modules. Build your pages with the steps in Set up your pages.
Template styles
Go to System » Site Template Styles. PX University has four styles 1. PX University - Inner is the default 2: every page that has no other style uses it.
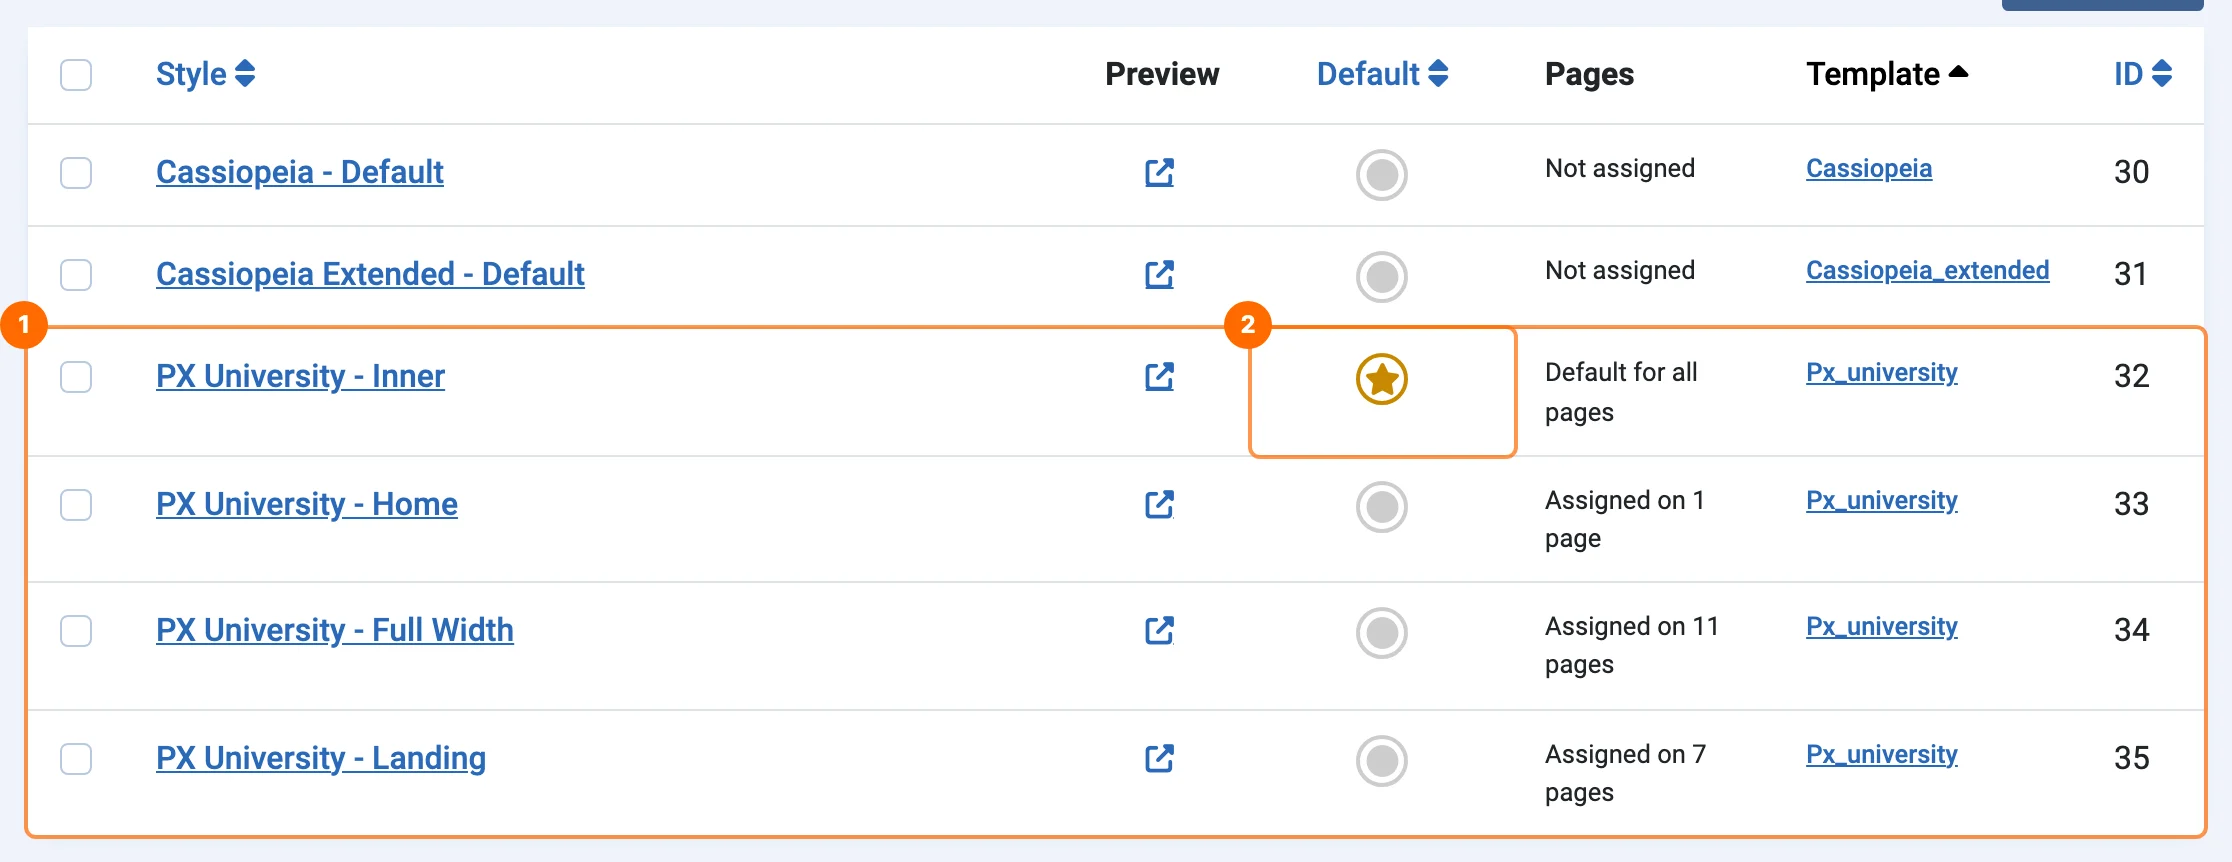
| Style | T4 layout | Used for |
|---|---|---|
| PX University - Home | home | Home page: hero and sections 1 to 9. |
| PX University - Inner | default | News, events, programmes and contact: content with a right sidebar. |
| PX University - Full Width | no-sidebar | About, History, Leadership, Academics, Visit, Research, Campus life. |
| PX University - Landing | landing | The six school pages and Admissions: a large hero, then full-width sections. |
Assign a style to a page
Open the menu item in Menus, and choose the style in Template Style on the Details tab.

Template settings (T4)
Click a style name in Site Template Styles to open the T4 settings screen.
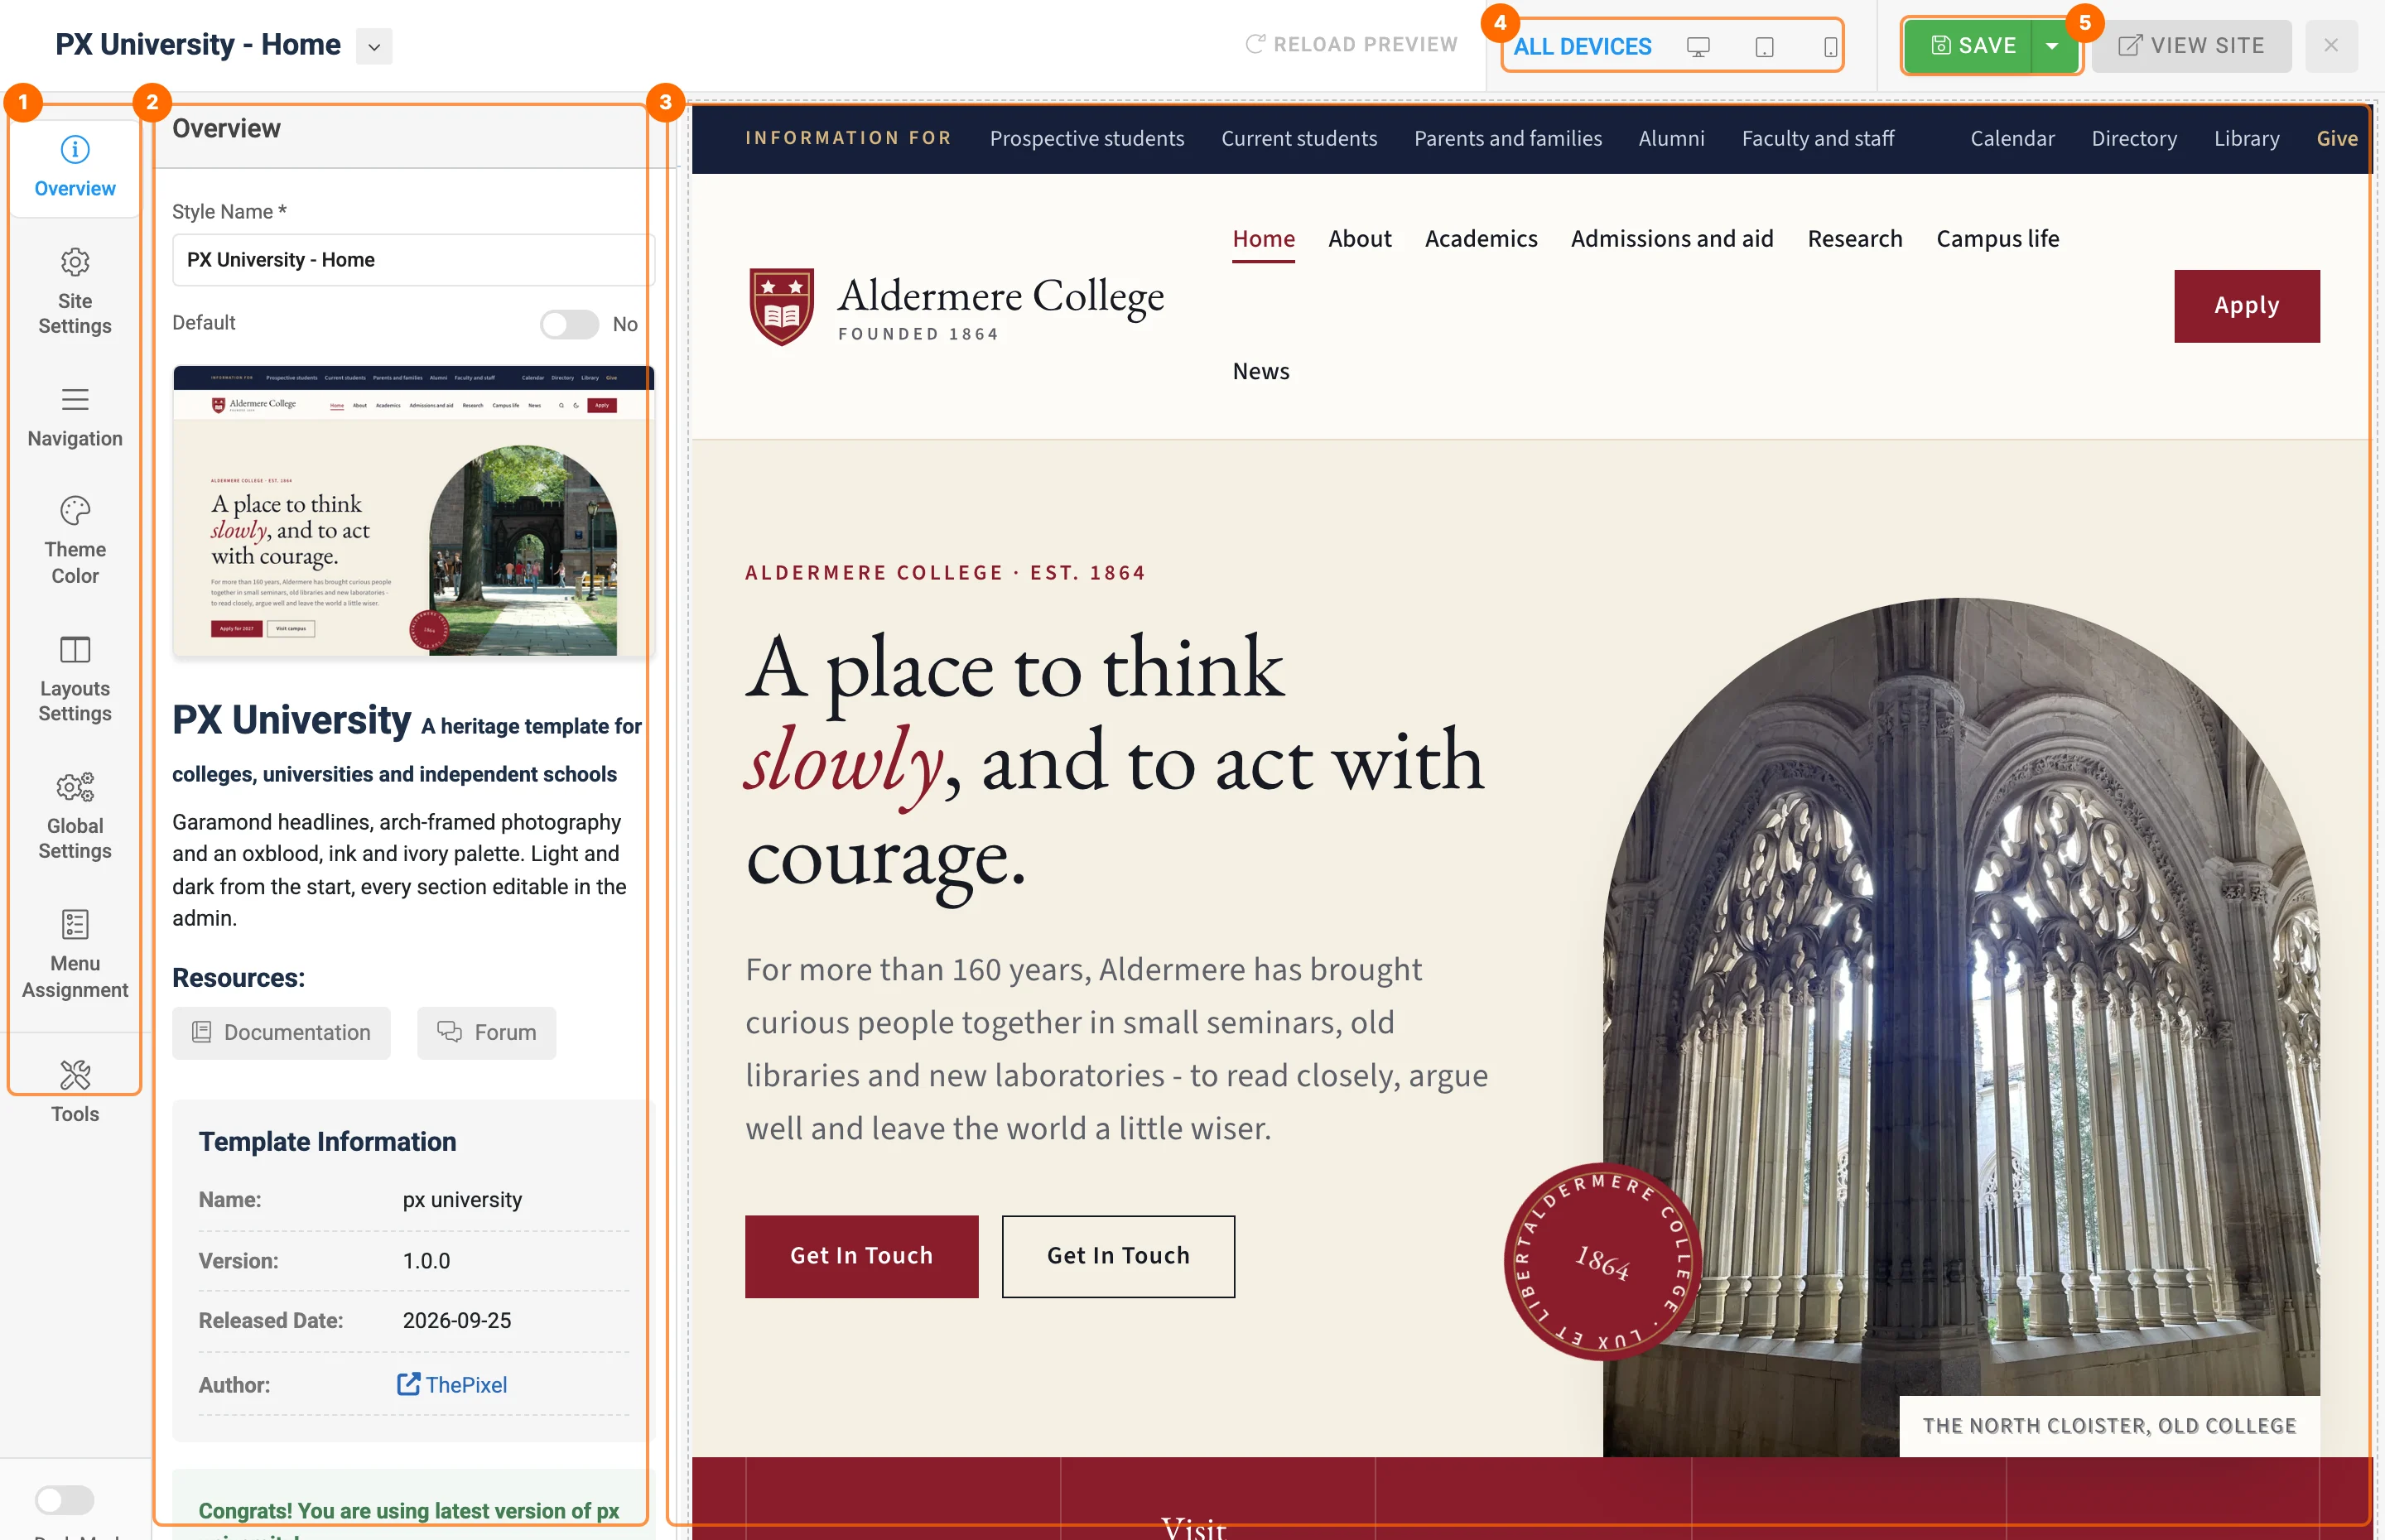
- 1Settings menu: Site Settings, Navigation, Theme Color, Layouts, Global Settings, Menu Assignment and Tools.
- 2Settings panel for the item you chose.
- 3Live preview of your site. It updates as you change settings.
- 4Device preview: desktop, tablet or phone.
- 5Save the style.
Site Settings, Navigation, Theme Color and Layouts are saved as named profiles (default, home…). Several styles can share a profile, so a change to the logo or colours in one style shows on every style that uses the same profile.
Logo and fonts
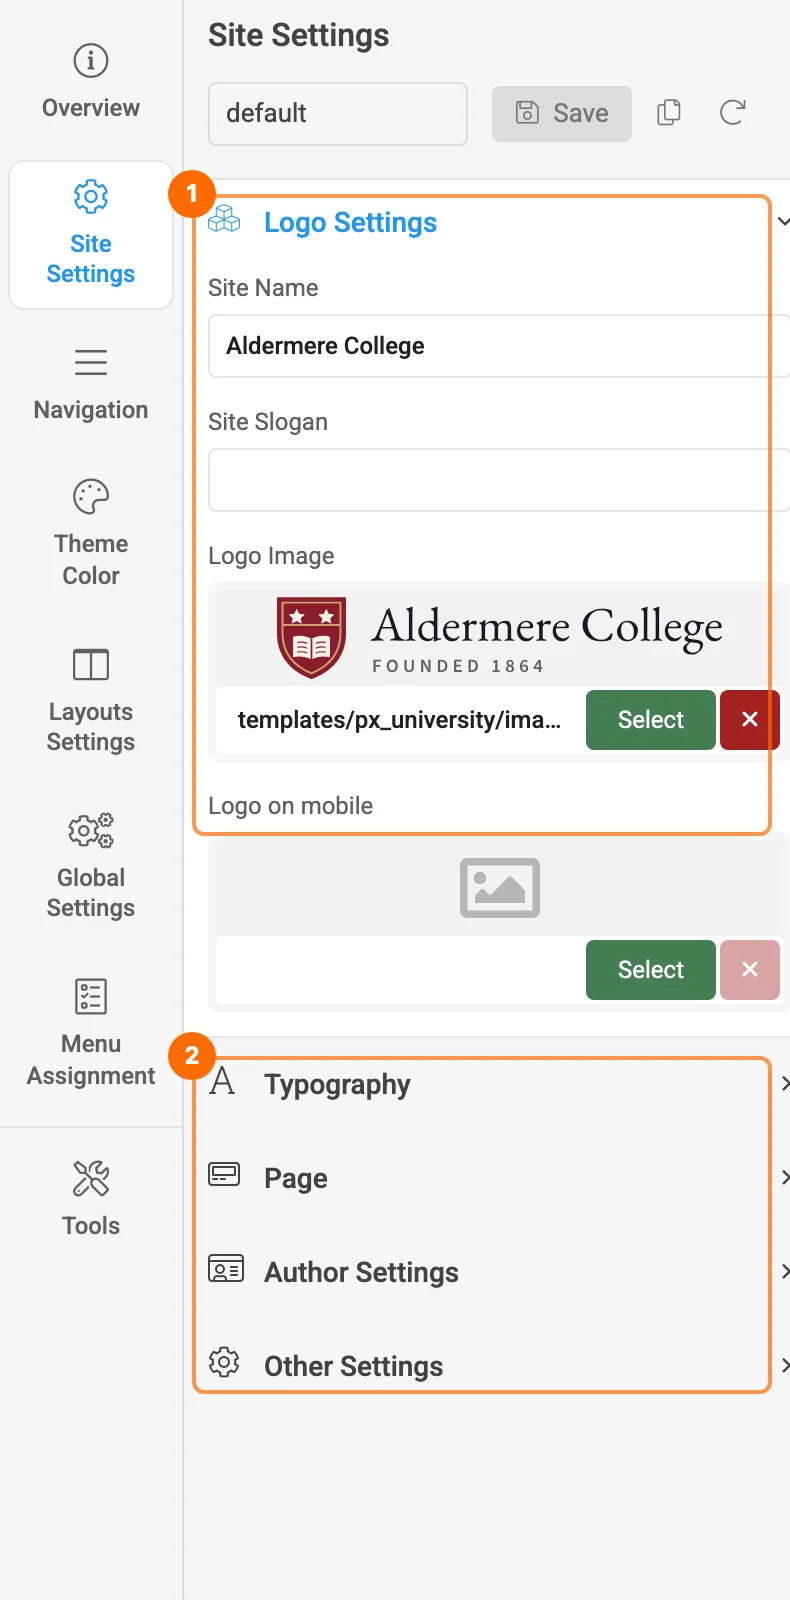
- 1Logo Settings: site name, slogan, logo image and a smaller logo for phones. The demo logo is
templates/px_university/images/logo-aldermere.svg. - 2Typography: body and heading fonts. The demo uses Source Sans 3 for text and EB Garamond for headings. Page, Author Settings and Other Settings hold the page background, author box and back-to-top button.
Colours
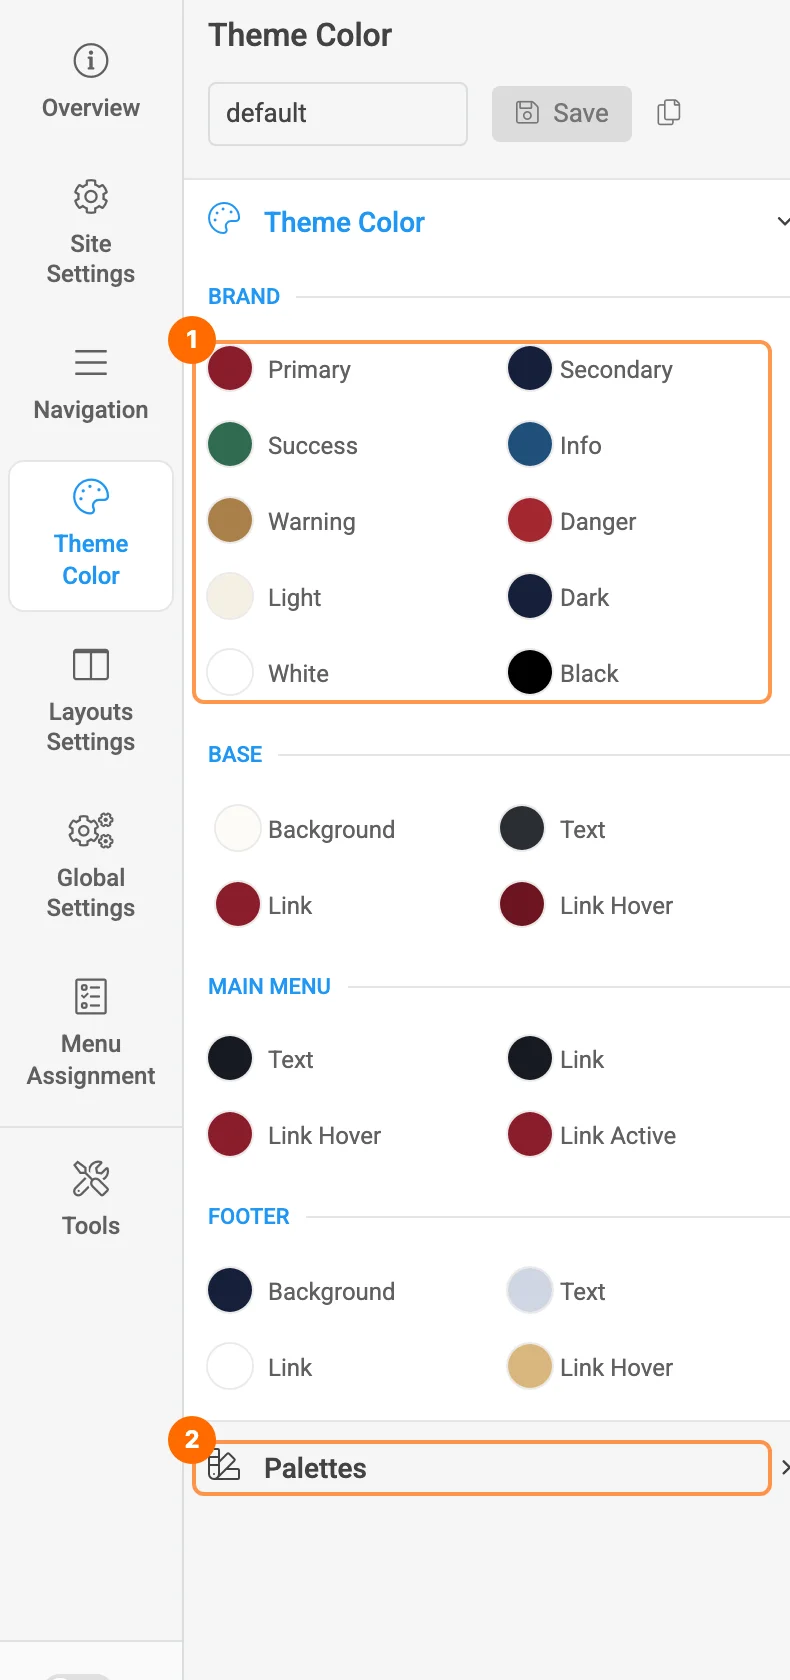
- 1Brand colours: change Primary (the oxblood red) and Secondary (the ink blue) to your school colours. Base, main menu and footer colours are below.
- 2Palettes: colour sets that sections and modules can use for their background and text.
Menu and megamenu
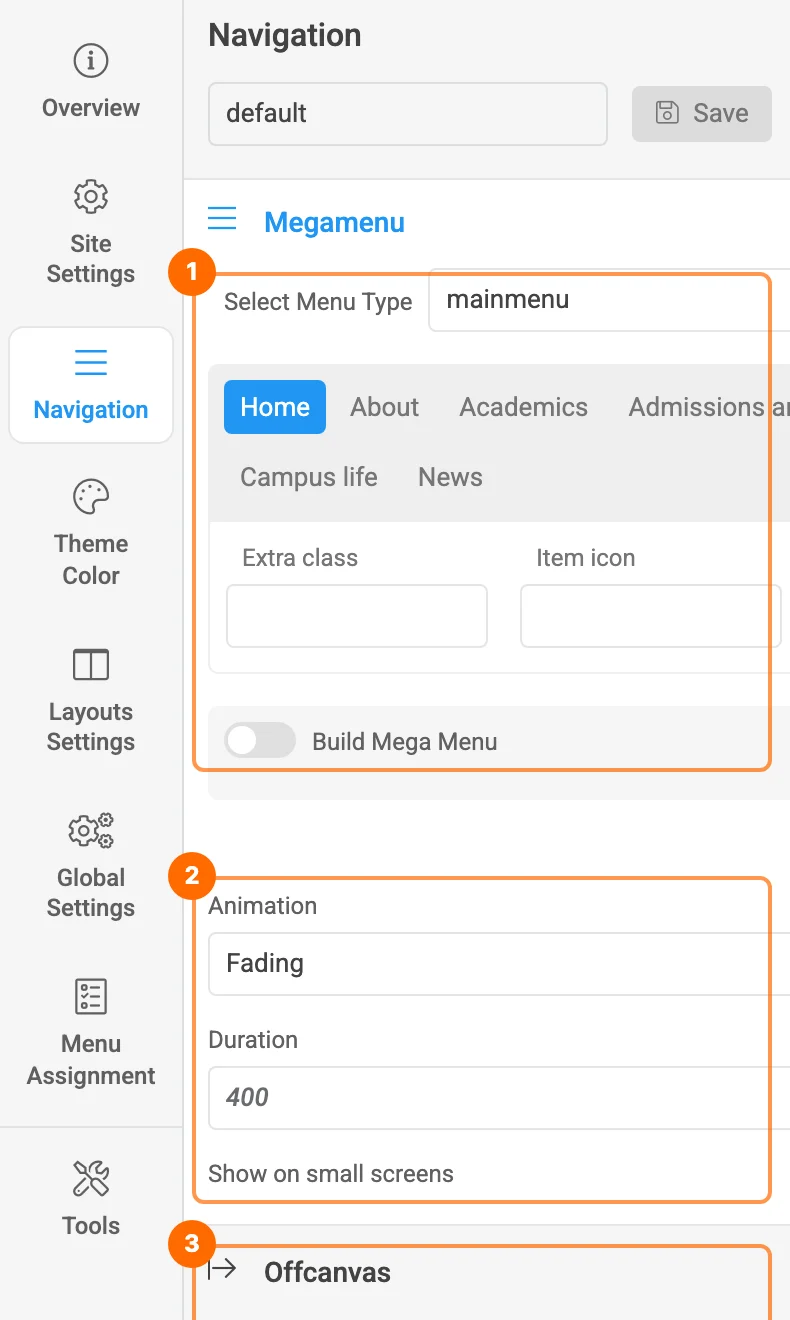
- 1Megamenu: pick the menu (mainmenu), click a menu item, then turn on Build Mega Menu to add columns and modules to its dropdown. Academics uses this in the demo.
- 2Animation and duration of the dropdowns.
- 3Offcanvas (the mobile menu) and Menu Breakpoint, the screen width where the menu switches to the mobile menu.
Layouts
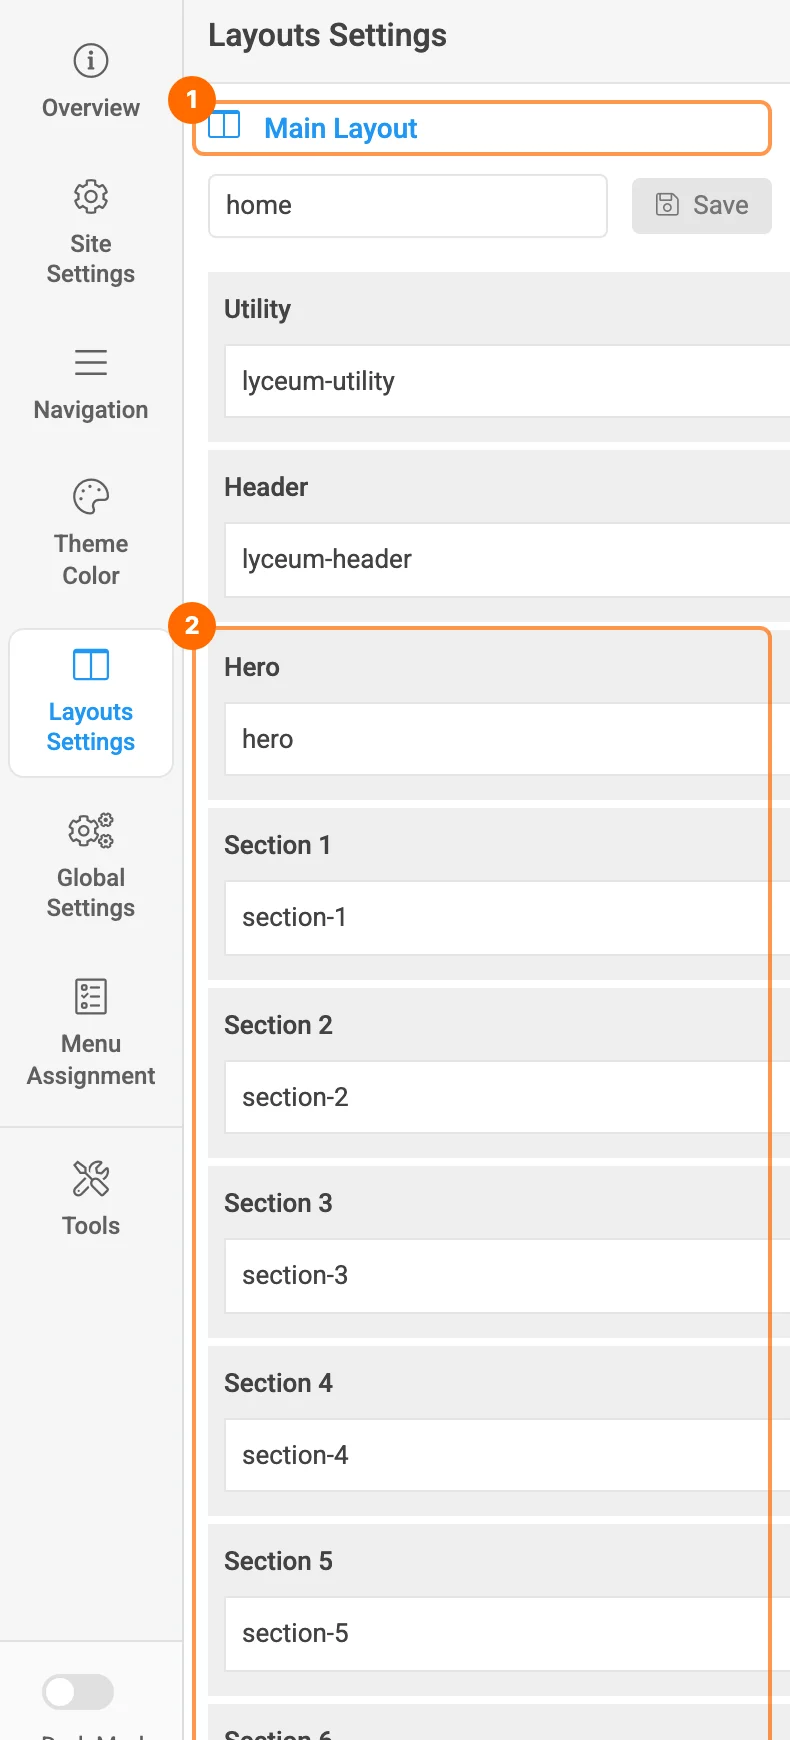
- 1Main Layout: the layout this style uses. Each style has its own (see the table in Template styles).
- 2Sections: the rows of the page, from top to bottom, each with its module position. Drag rows to reorder them, or open a row's settings to change its width and background.
Global settings
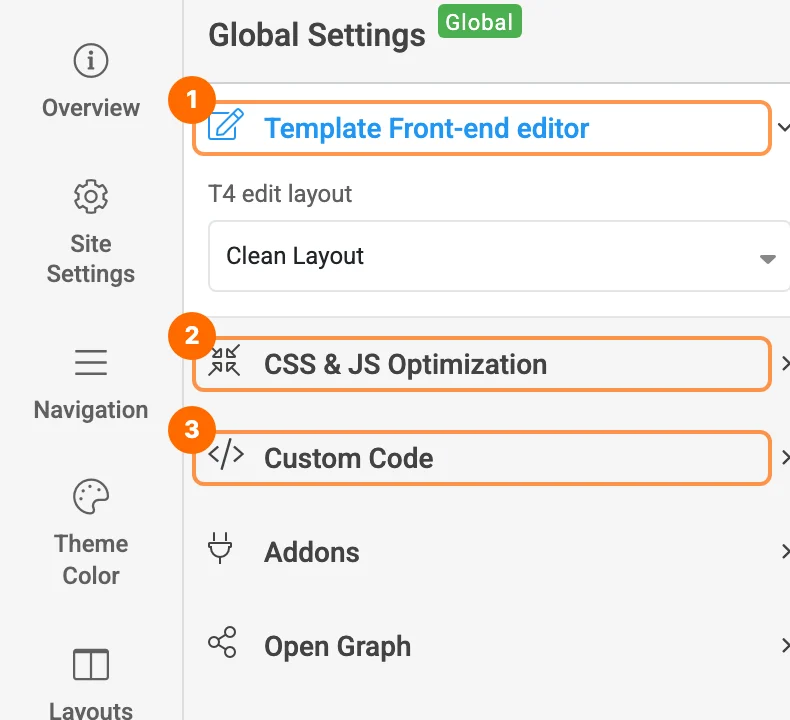
- 1Template Front-end editor: edit the layout from the front end when you are logged in.
- 2CSS & JS Optimization: combine and minify the template files. Keep it on for a live site.
- 3Custom Code: add tracking code or scripts before
</head>or</body>.
Your own CSS
Use Tools » Edit Custom CSS for small changes. Your CSS is kept when you update the template.
Module positions
Every section of a page is a module in a position. The home page uses these positions:

| Position | Where | Layouts |
|---|---|---|
utility-l, utility-r | Top bar: “Information for” and quick links menus | all |
header-cta | Button next to the main menu (“Apply”) | all |
hero | Large banner under the menu | home, landing |
section-1 … section-9 | Full-width sections of the home page | home |
section-l, section-r | Two columns: latest news and events | home |
masthead, breadcrumbs | Page title area and breadcrumbs | default, no-sidebar |
page-top, page-bottom | Sections above and below the article | default, no-sidebar, landing |
sidebar-r | Right sidebar | default |
footnav-1 … footnav-5 | Footer columns | all |
footer | Bottom bar: copyright and legal menu | all |
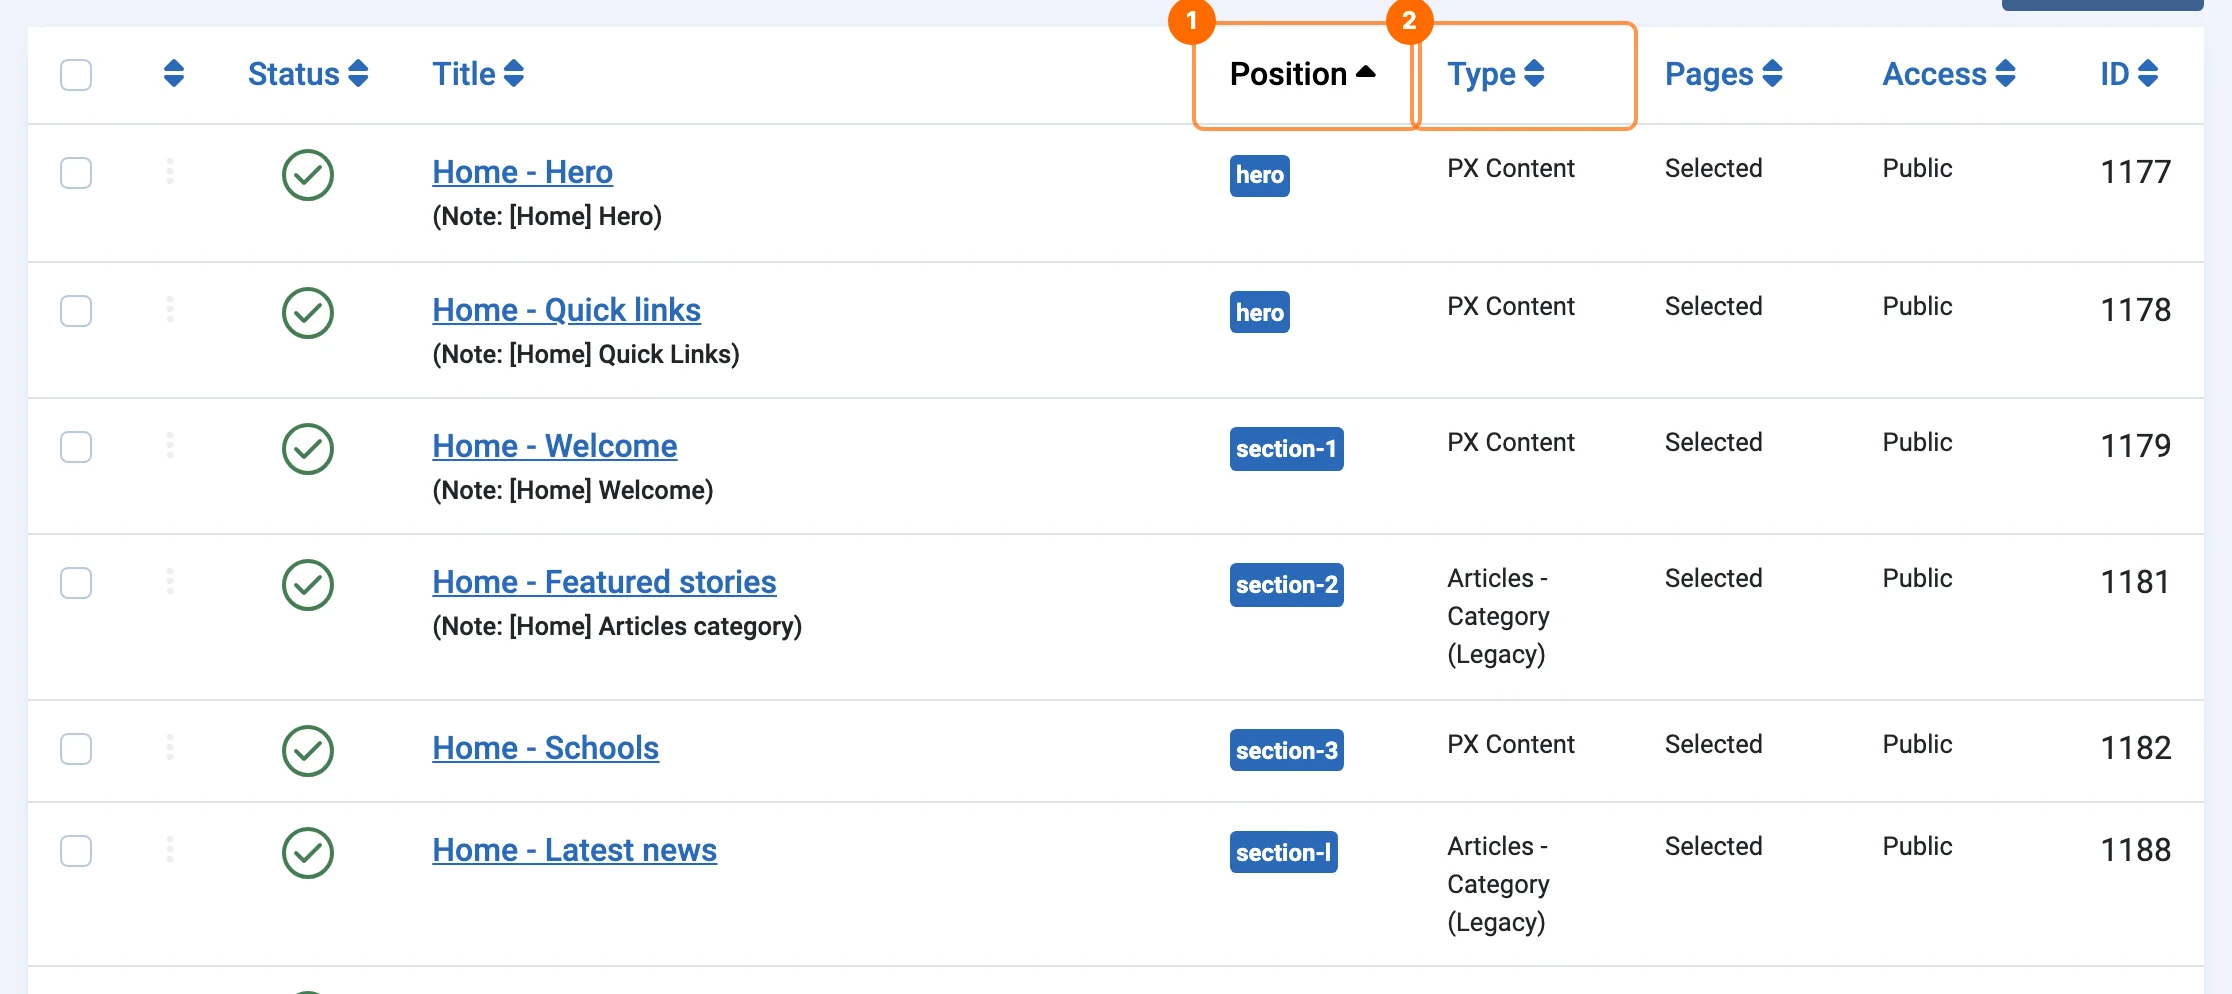
Go to Content » Site Modules to see every module with its position 1 and type 2. Type part of a title in the search box, e.g. Home -, to see the modules of one page.
PX Content blocks
Most sections are a PX Content module. Each module shows one block, for example a hero, a row of numbers or a timeline, with its own text, pictures, colours and buttons.
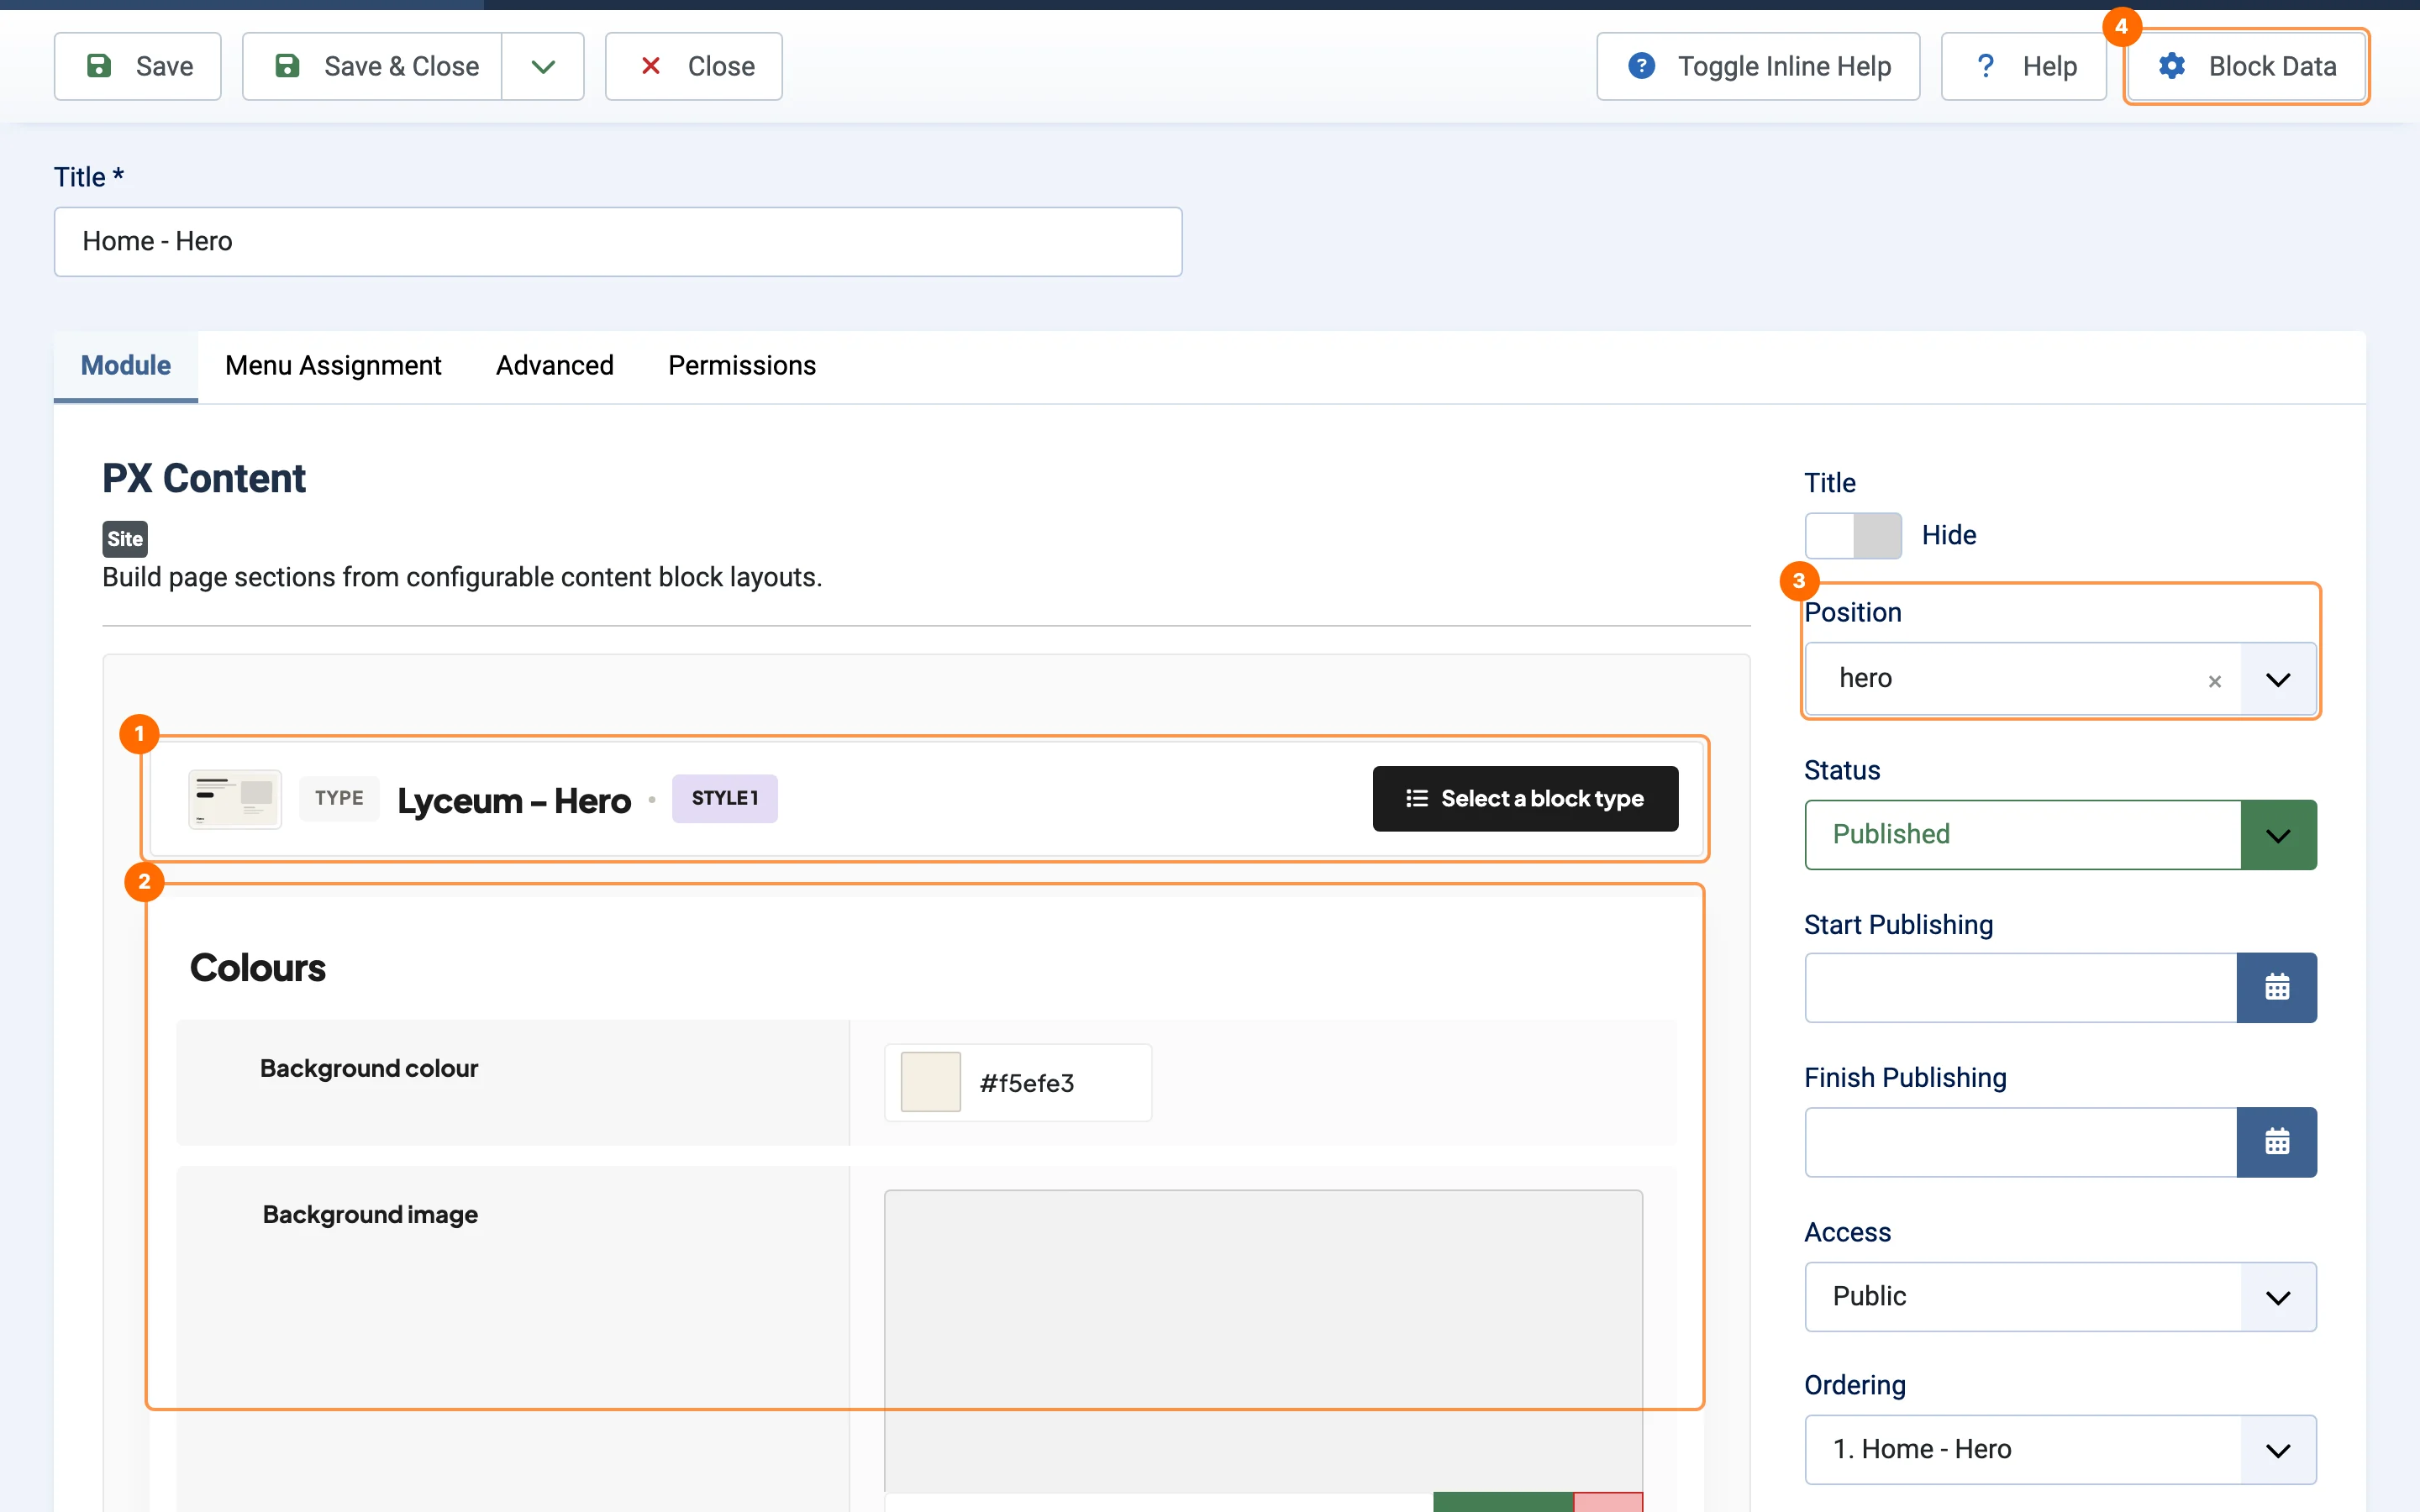
- 1Block type and style: the block this module shows. Click Select a block type to change it.
- 2Block settings: colours, background image, texts and buttons. The fields change with the block type.
- 3Position: where the block shows (see Module positions). Choose the pages on the Menu Assignment tab.
- 4Block Data: all settings of the block as JSON, handy to copy a block to another site.
Choose a block type
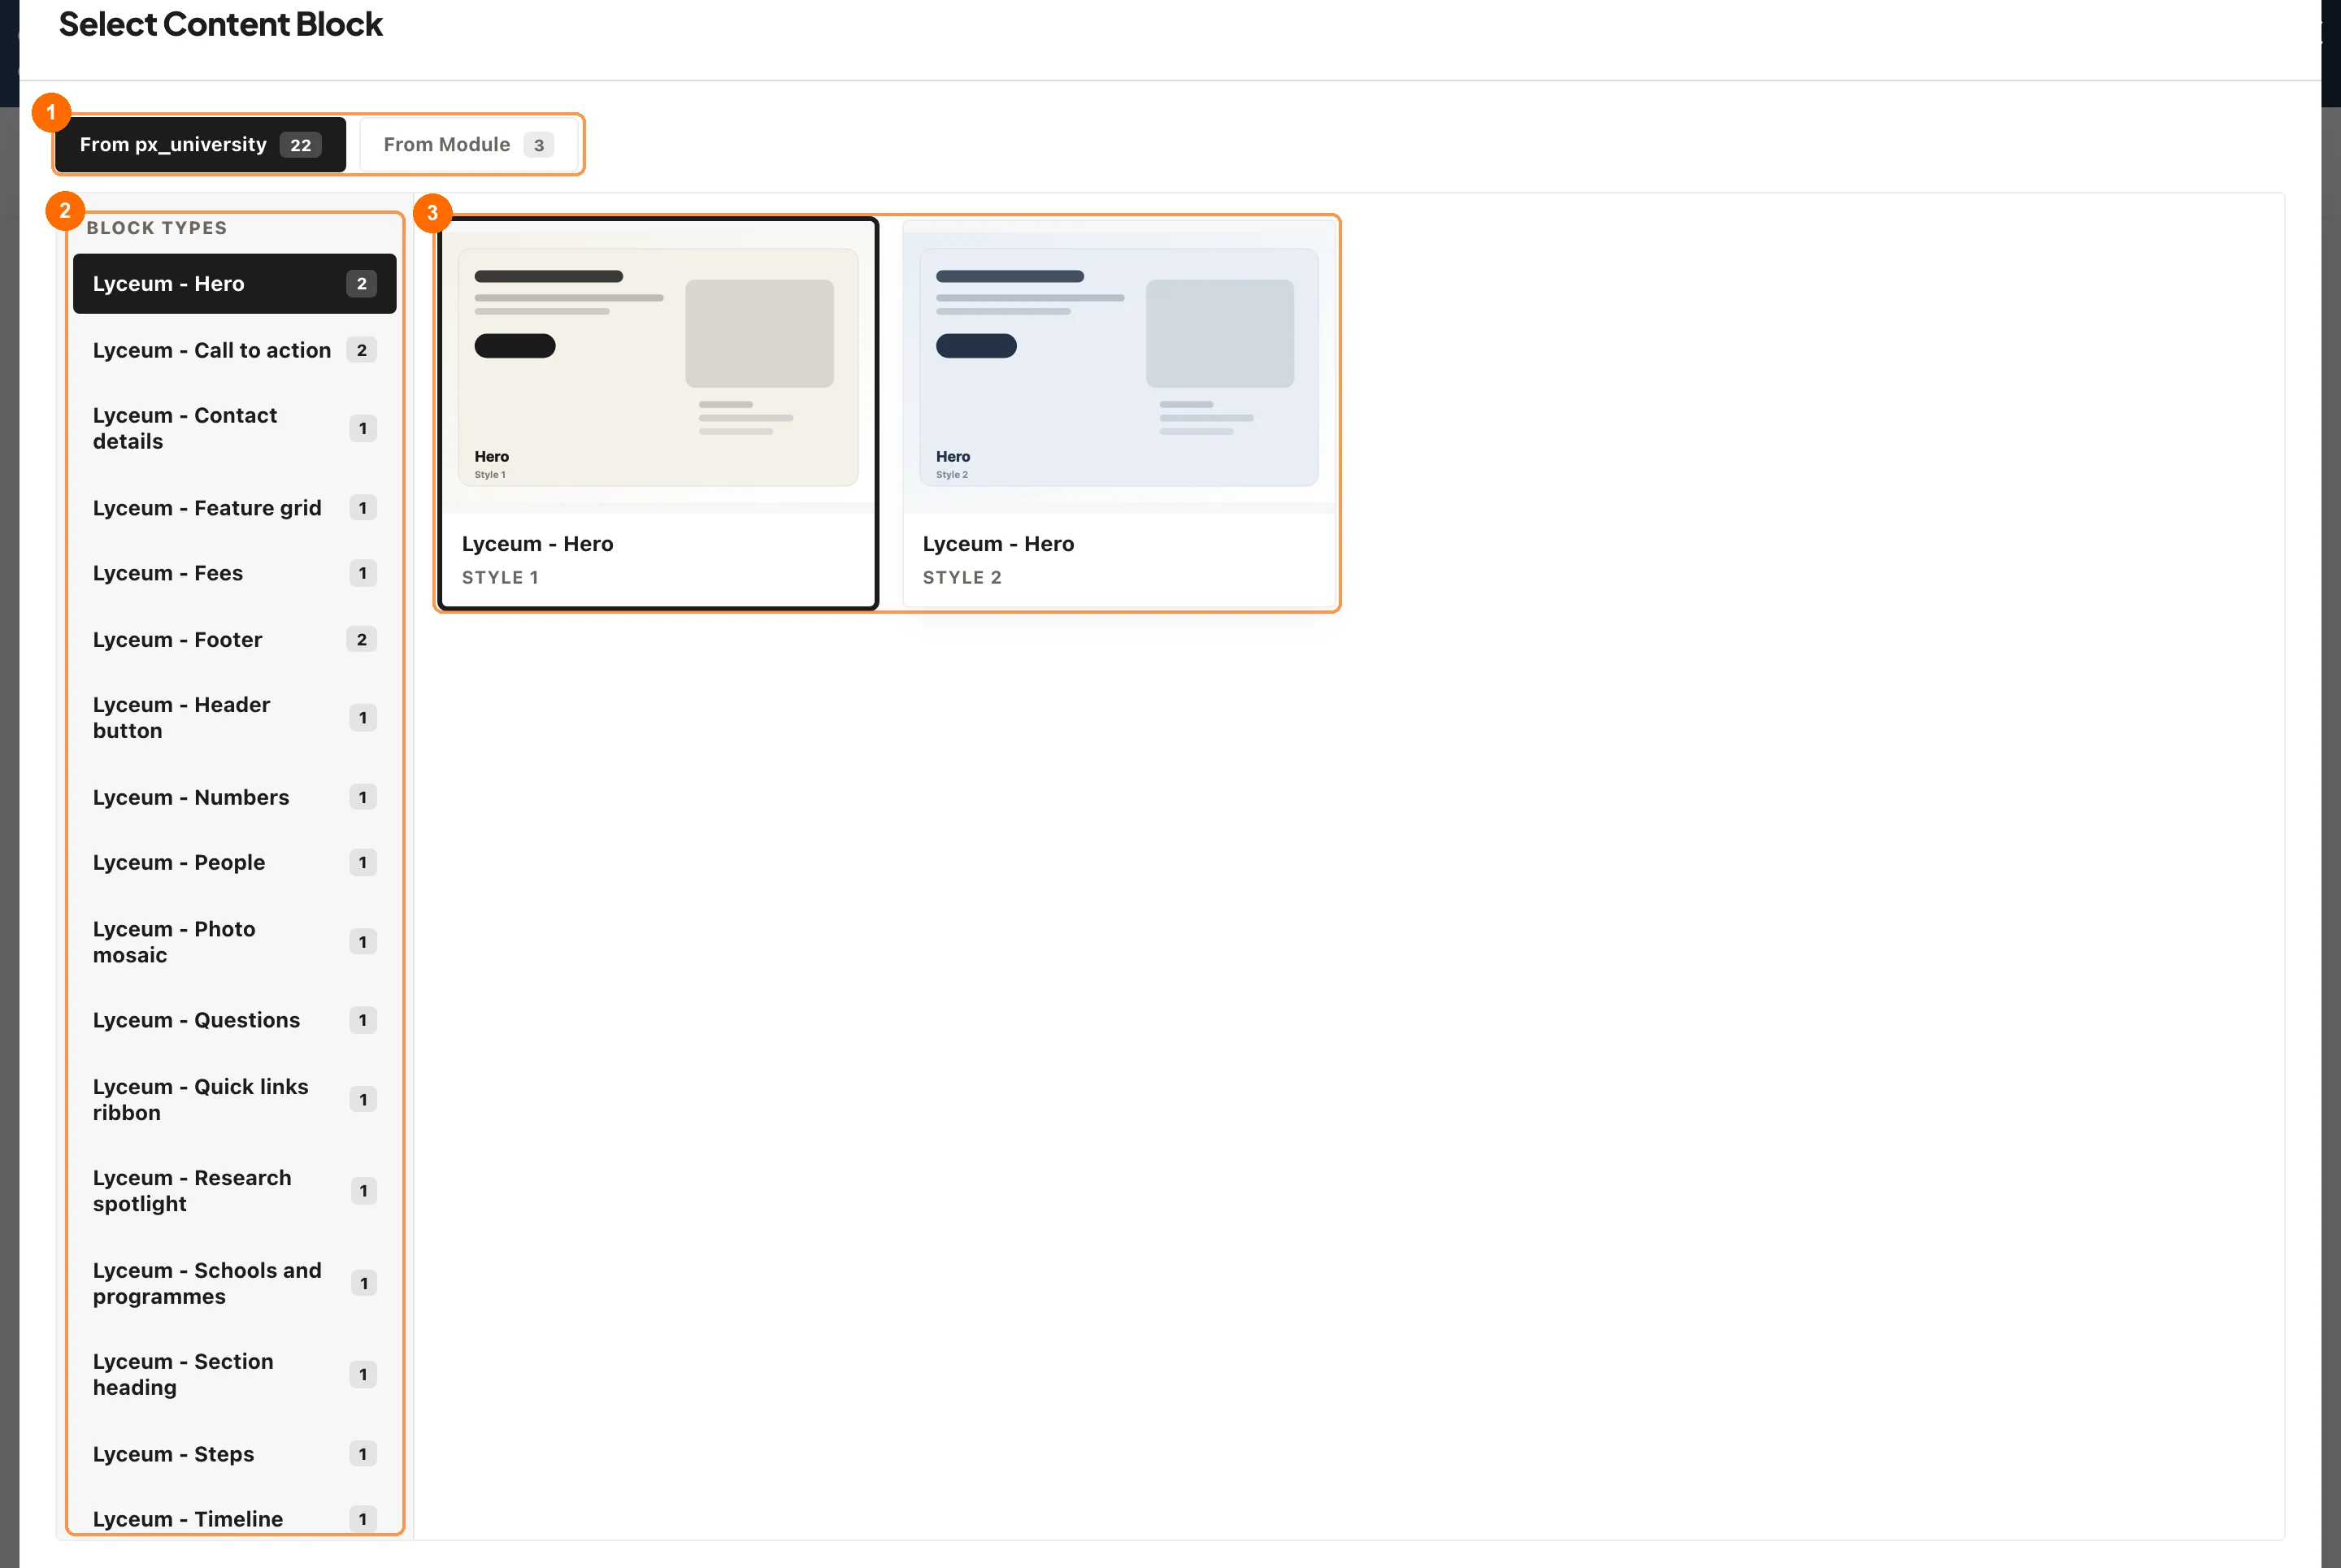
- 1From px_university lists the blocks made for this template. From Module lists the general blocks that come with PX Content.
- 2Block types, with the number of styles for each.
- 3Styles: click one, then Update.
| Block | Used in the demo for |
|---|---|
| Hero | Home and school page banners |
| Quick links ribbon | The red row of links under the home hero |
| Intro / Feature grid | Welcome texts, “What makes Aldermere” |
| Section heading | Titles above news, events and programme lists |
| Schools and programmes | The six schools with programme search |
| Numbers | Key figures (founded, ratio, employment…) |
| Research spotlight | Research section of the home page |
| Photo mosaic | Campus life pictures |
| Testimonials | Student and alumni quotes |
| Timeline | History and traditions |
| People | Leadership |
| Steps | How to apply |
| Fees | Tuition |
| Questions | Admissions FAQ |
| Call to action | “Visit us”, “Apply” bands at the end of pages |
| Contact details | Offices on the contact page |
| Header button, Footer | The “Apply” button and the footer brand and bottom bar |
Edit texts on the page
With Frontend Inline Edit on (module Advanced tab), users who can edit modules can log in on the site and click Edit content. Then double-click a text to change it, and use the Img / BG buttons to pick a picture from the Media Manager. Press Ctrl/⌘+Enter to save.
News, events and programme lists
Lists of articles use the Joomla Articles - Category module with a PX University layout. Open the module, go to the Advanced tab and choose the Layout.

| Layout | Shows |
|---|---|
feature-stories | One large story with smaller ones beside it (home, research) |
news-list | Dated news list with thumbnails (home, school pages) |
events | Upcoming events with date badges (home, visit, sidebar) |
programme-cards | Programme cards with level and length (school pages) |
cards, grid-layout | Cards in a grid |
blog-layout, list-layout, highlight-layout | Other list styles you can use anywhere |
Choose the category, the number of items and the ordering on the module's Module tab, as with any Articles - Category module. Events are articles in the Events category; their date comes from the article's calendar field.
Set up your pages
The quickstart has every page ready; replace the texts and pictures with your own. To build a page from scratch:
Home page
- Menus » Main Menu: create a menu item of type Articles » Featured Articles, set it as Default Page and choose the style PX University - Home.
- Content » Site Modules » New » PX Content: choose the block type Hero, set the position
heroand assign it to the home menu item only. - Add the next sections the same way in
section-1tosection-9, and the news and events lists insection-landsection-r.
Inner pages
- Create the article (for example About).
- Create a menu item of type Single Article for it and choose PX University - Full Width, or Landing for a page that starts with a large hero.
- Add PX Content modules in
page-top(above the article) orpage-bottom(below it), assigned to that menu item.
News and events
- Create a menu item of type Category Blog for the News (or Events) category. It uses the default Inner style with the right sidebar.
- Put the sidebar modules (categories, upcoming events, popular tags) in
sidebar-r.
Footer
The footer columns are menu modules in footnav-2 to footnav-4, with the school logo and address (PX Content Footer block) in footnav-1. The copyright line and legal menu are in footer.
Upgrade
Take a full backup
Back up your files and database before any upgrade, so you can go back if something goes wrong.
- Download the latest Template, T4 Framework plugin and PX Content module from your account.
- Install them through System » Install » Extensions, the same way as a new install. Joomla updates them in place.
- Your template settings, modules and custom CSS are kept.
Do not edit the template files directly: an upgrade overwrites them. Put your changes in Custom CSS instead.