
PX Adminer is a free database manager for the Joomla administrator. Browse and edit tables, run SQL, and export or import your database from Components → PX Adminer, without phpMyAdmin.
Overview
PX Adminer opens your site's database in Components → PX Adminer. It connects with the database settings of your Joomla site, so there is no extra login, no phpMyAdmin and no hosting control panel. PX Adminer is free.
- Tables and data: list every table, then browse, search, sort and filter its rows.
- Edit rows: change, add, clone or delete rows in a simple form.
- SQL command: run any SQL with syntax highlighting and see the results as a table.
- Export: download tables or the whole database as SQL, CSV or TSV, optionally gzipped.
- Import: run an
.sqlor.sql.gzfile. - Structure: see and change columns, indexes and foreign keys.
- Safe access: only Super Users can open it, and its session ends with your Joomla session.
PX Adminer is built on Adminer by Jakub Vrana.
Installation
System requirement
- Joomla 5.x or 6.x
- PHP 8.1 or later with the
mysqliextension - A MySQL or MariaDB database (other database types are not supported)
- In System → Global Configuration → System: Session Handler set to Database, or Track Session Metadata set to Yes (the Joomla default)
Install the package
- Log in on thepixel.dev and download
com_pxadminer_v1.0.0.zipfrom Account → Downloads. A free account is enough. - In the Joomla administrator, go to System → Install → Extensions.
- Open the Upload Package File tab 1 and drop the zip file into the upload area 2.
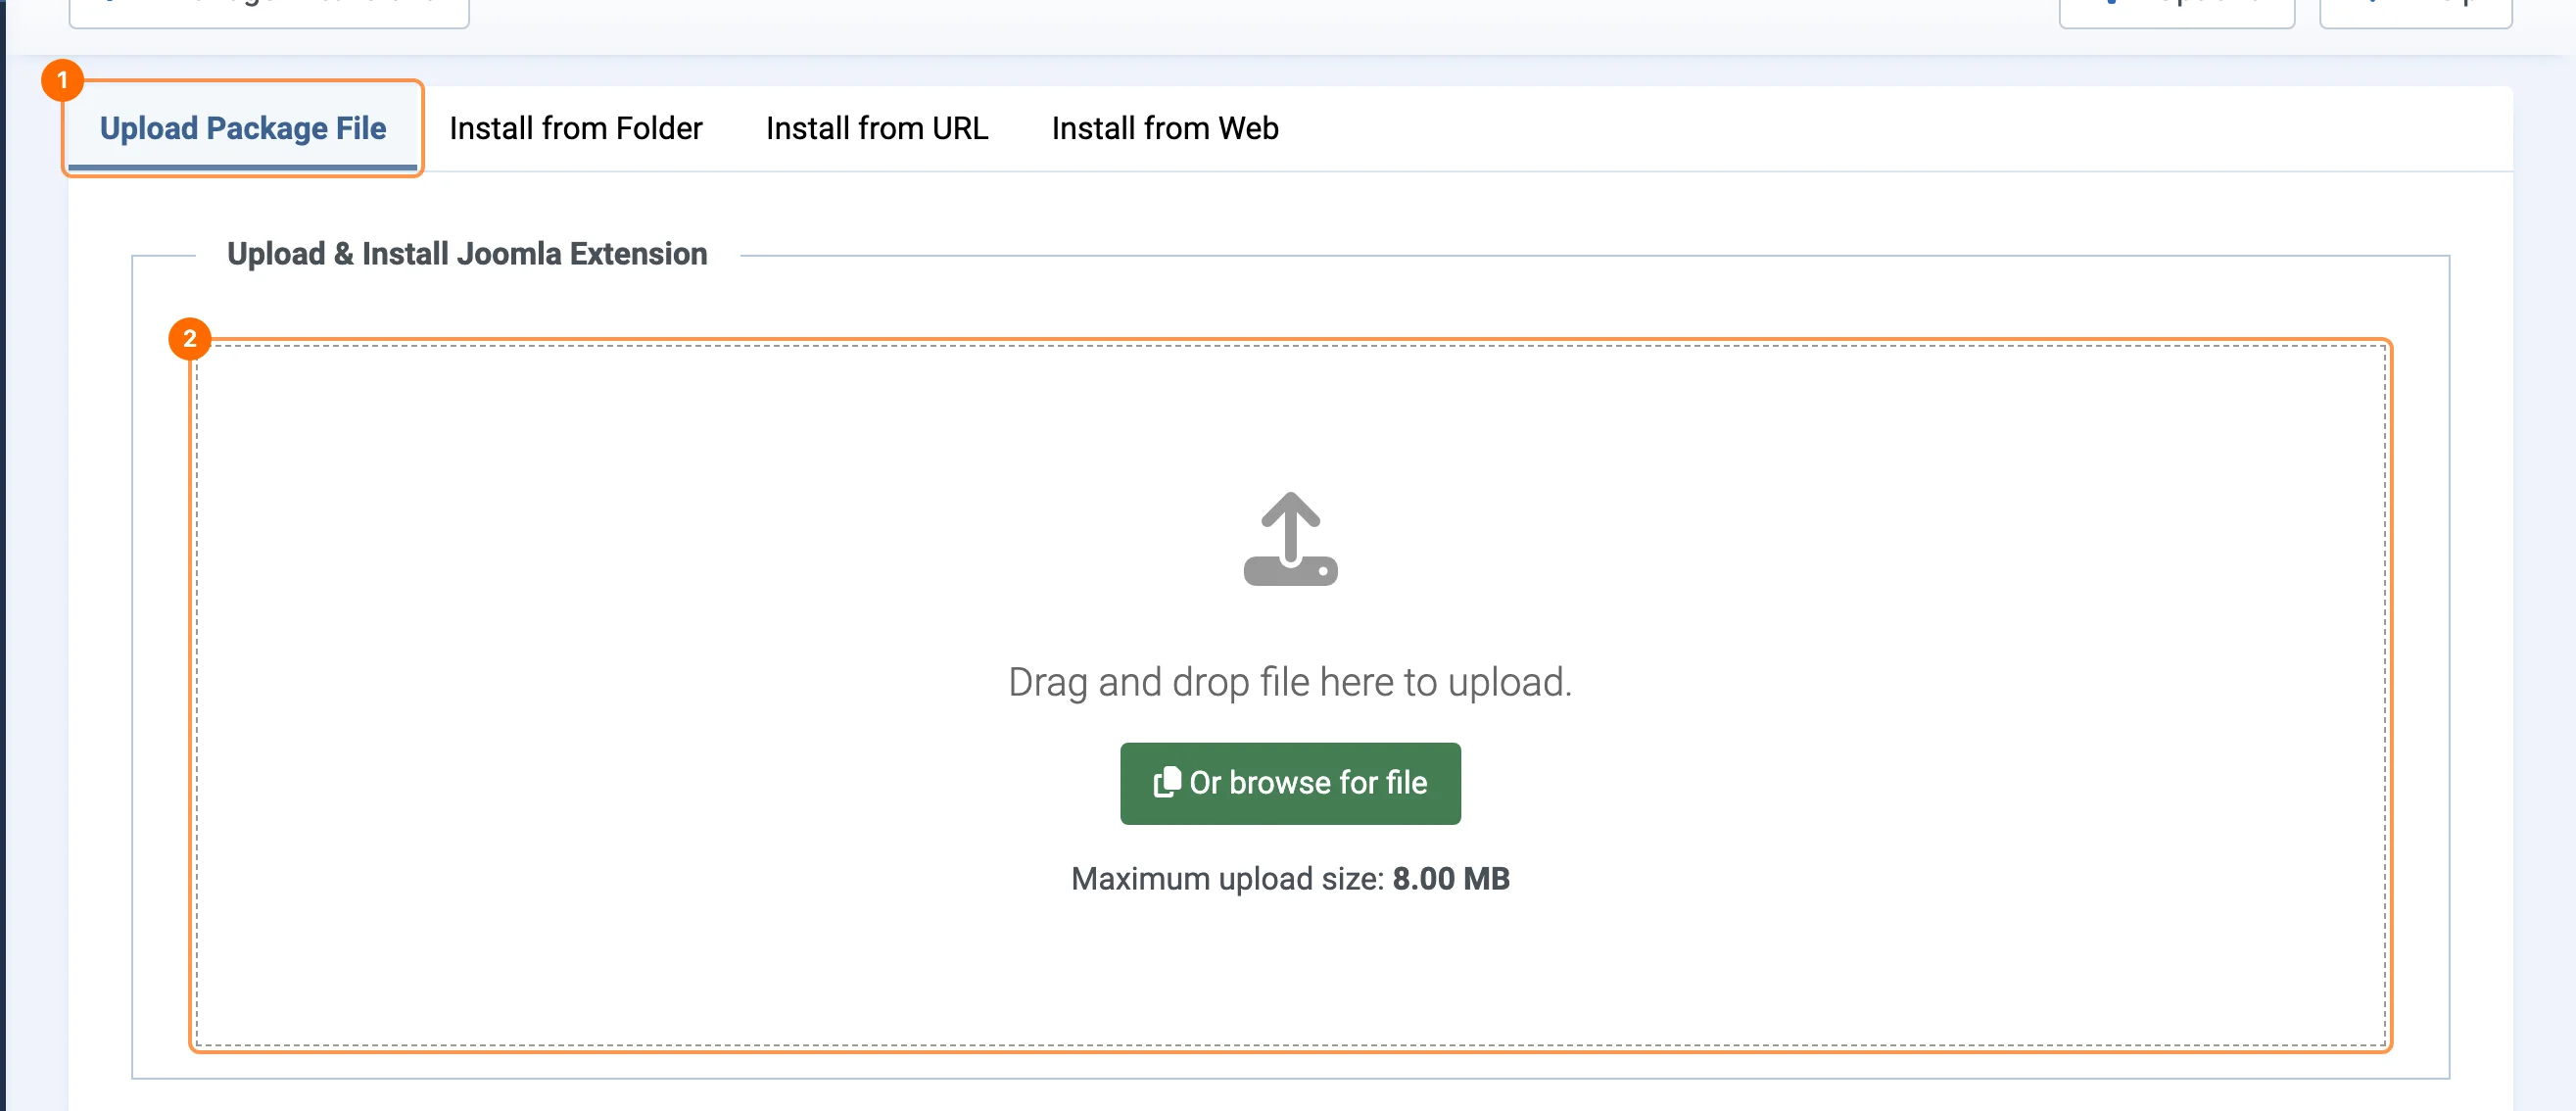
com_pxadminer_v1.0.0.zip in System → Install → Extensions.Open PX Adminer
After installation, open Components → PX Adminer. Your database opens right away, there is nothing to log in to.
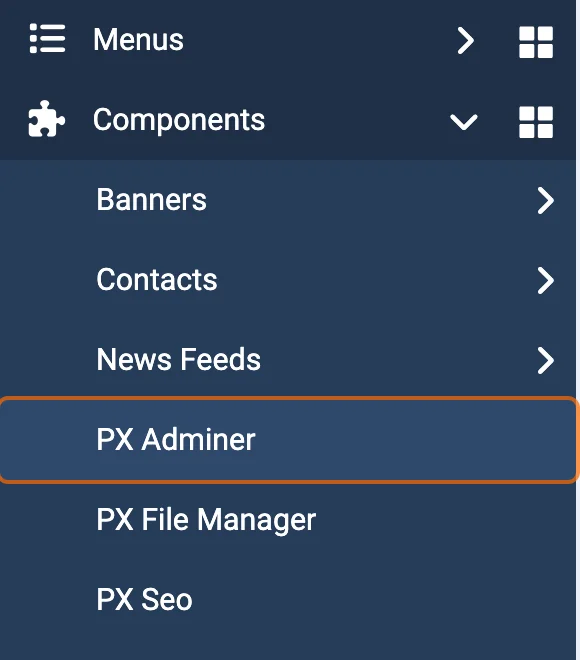
Only Super Users can open PX Adminer. See Security.
The interface
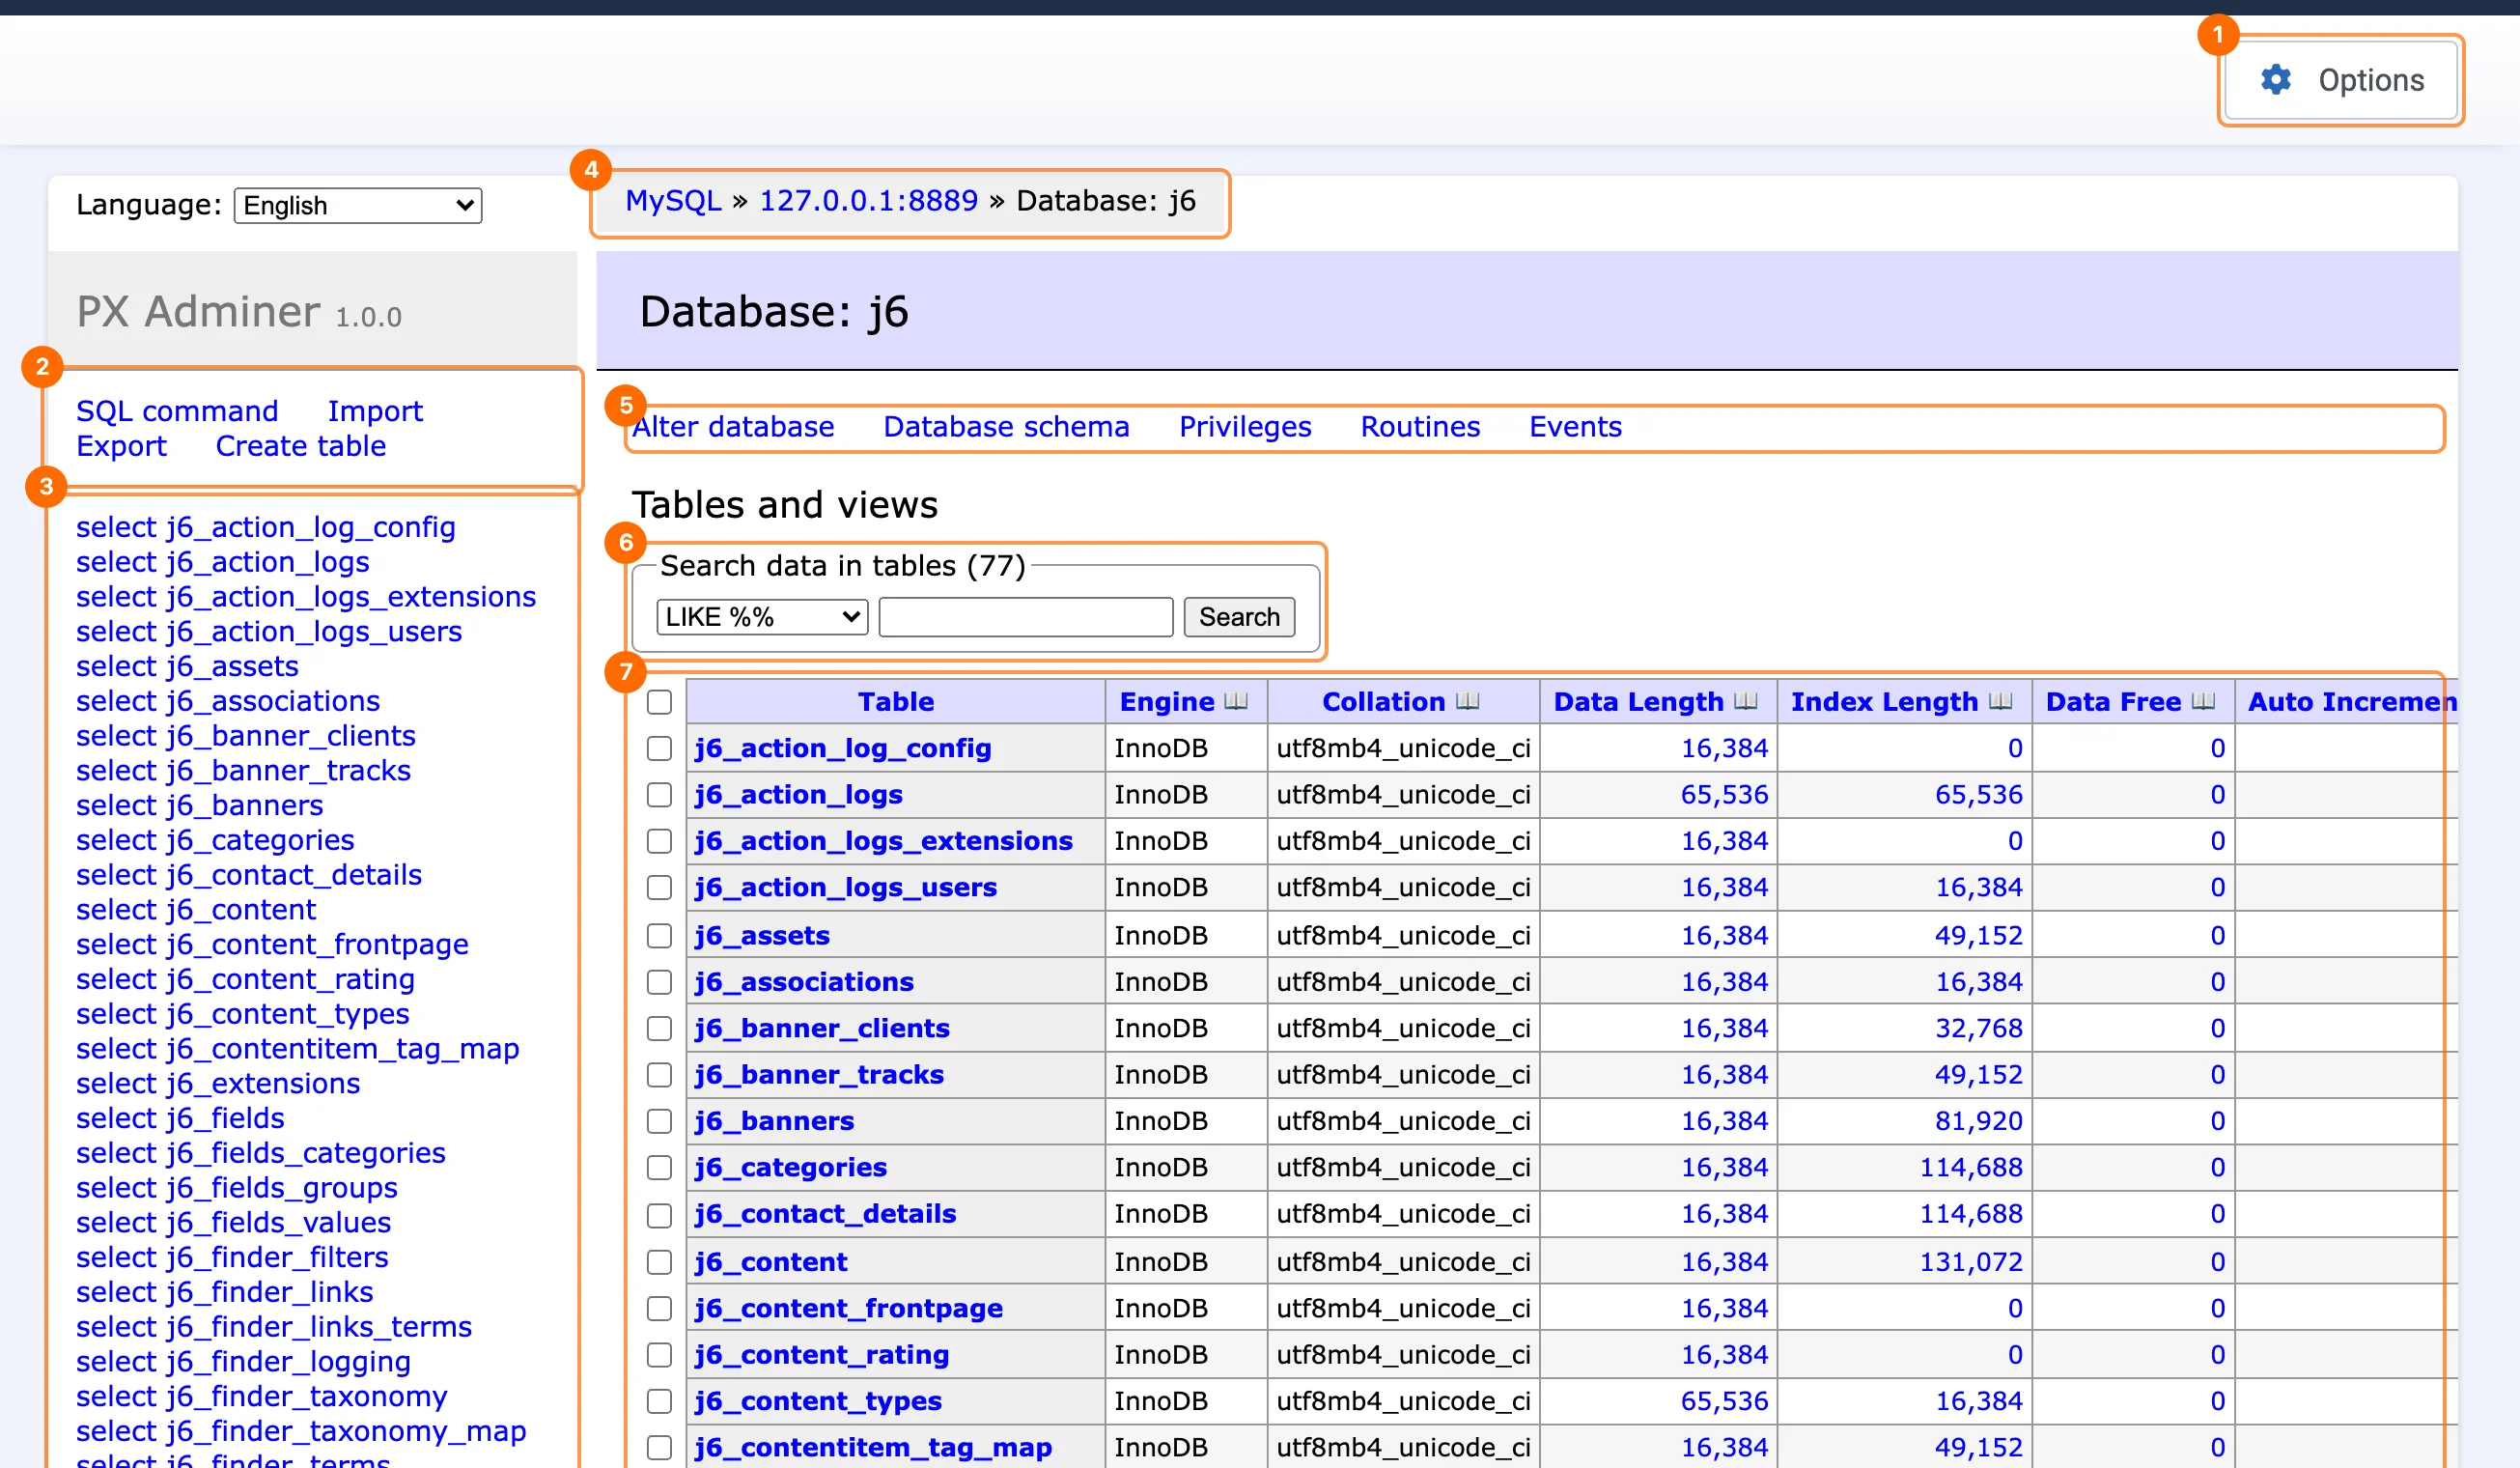
- 1Options: the Joomla options of the component.
- 2Database menu: SQL command, Import, Export and Create table.
- 3Table list: click a table name to browse its data.
- 4Breadcrumb: shows where you are. Click Database to go back to the table overview.
- 5Database actions: database settings, schema diagram, privileges, routines and events.
- 6Search data in tables: search a value in every table at once.
- 7Tables and views: engine, collation, size and row count of each table. Tick tables to analyze, optimize, check, repair, truncate or drop them.
Use the Language list above the menu to switch the PX Adminer interface to another language.
Browse data
Click a table in the table list to see its rows.
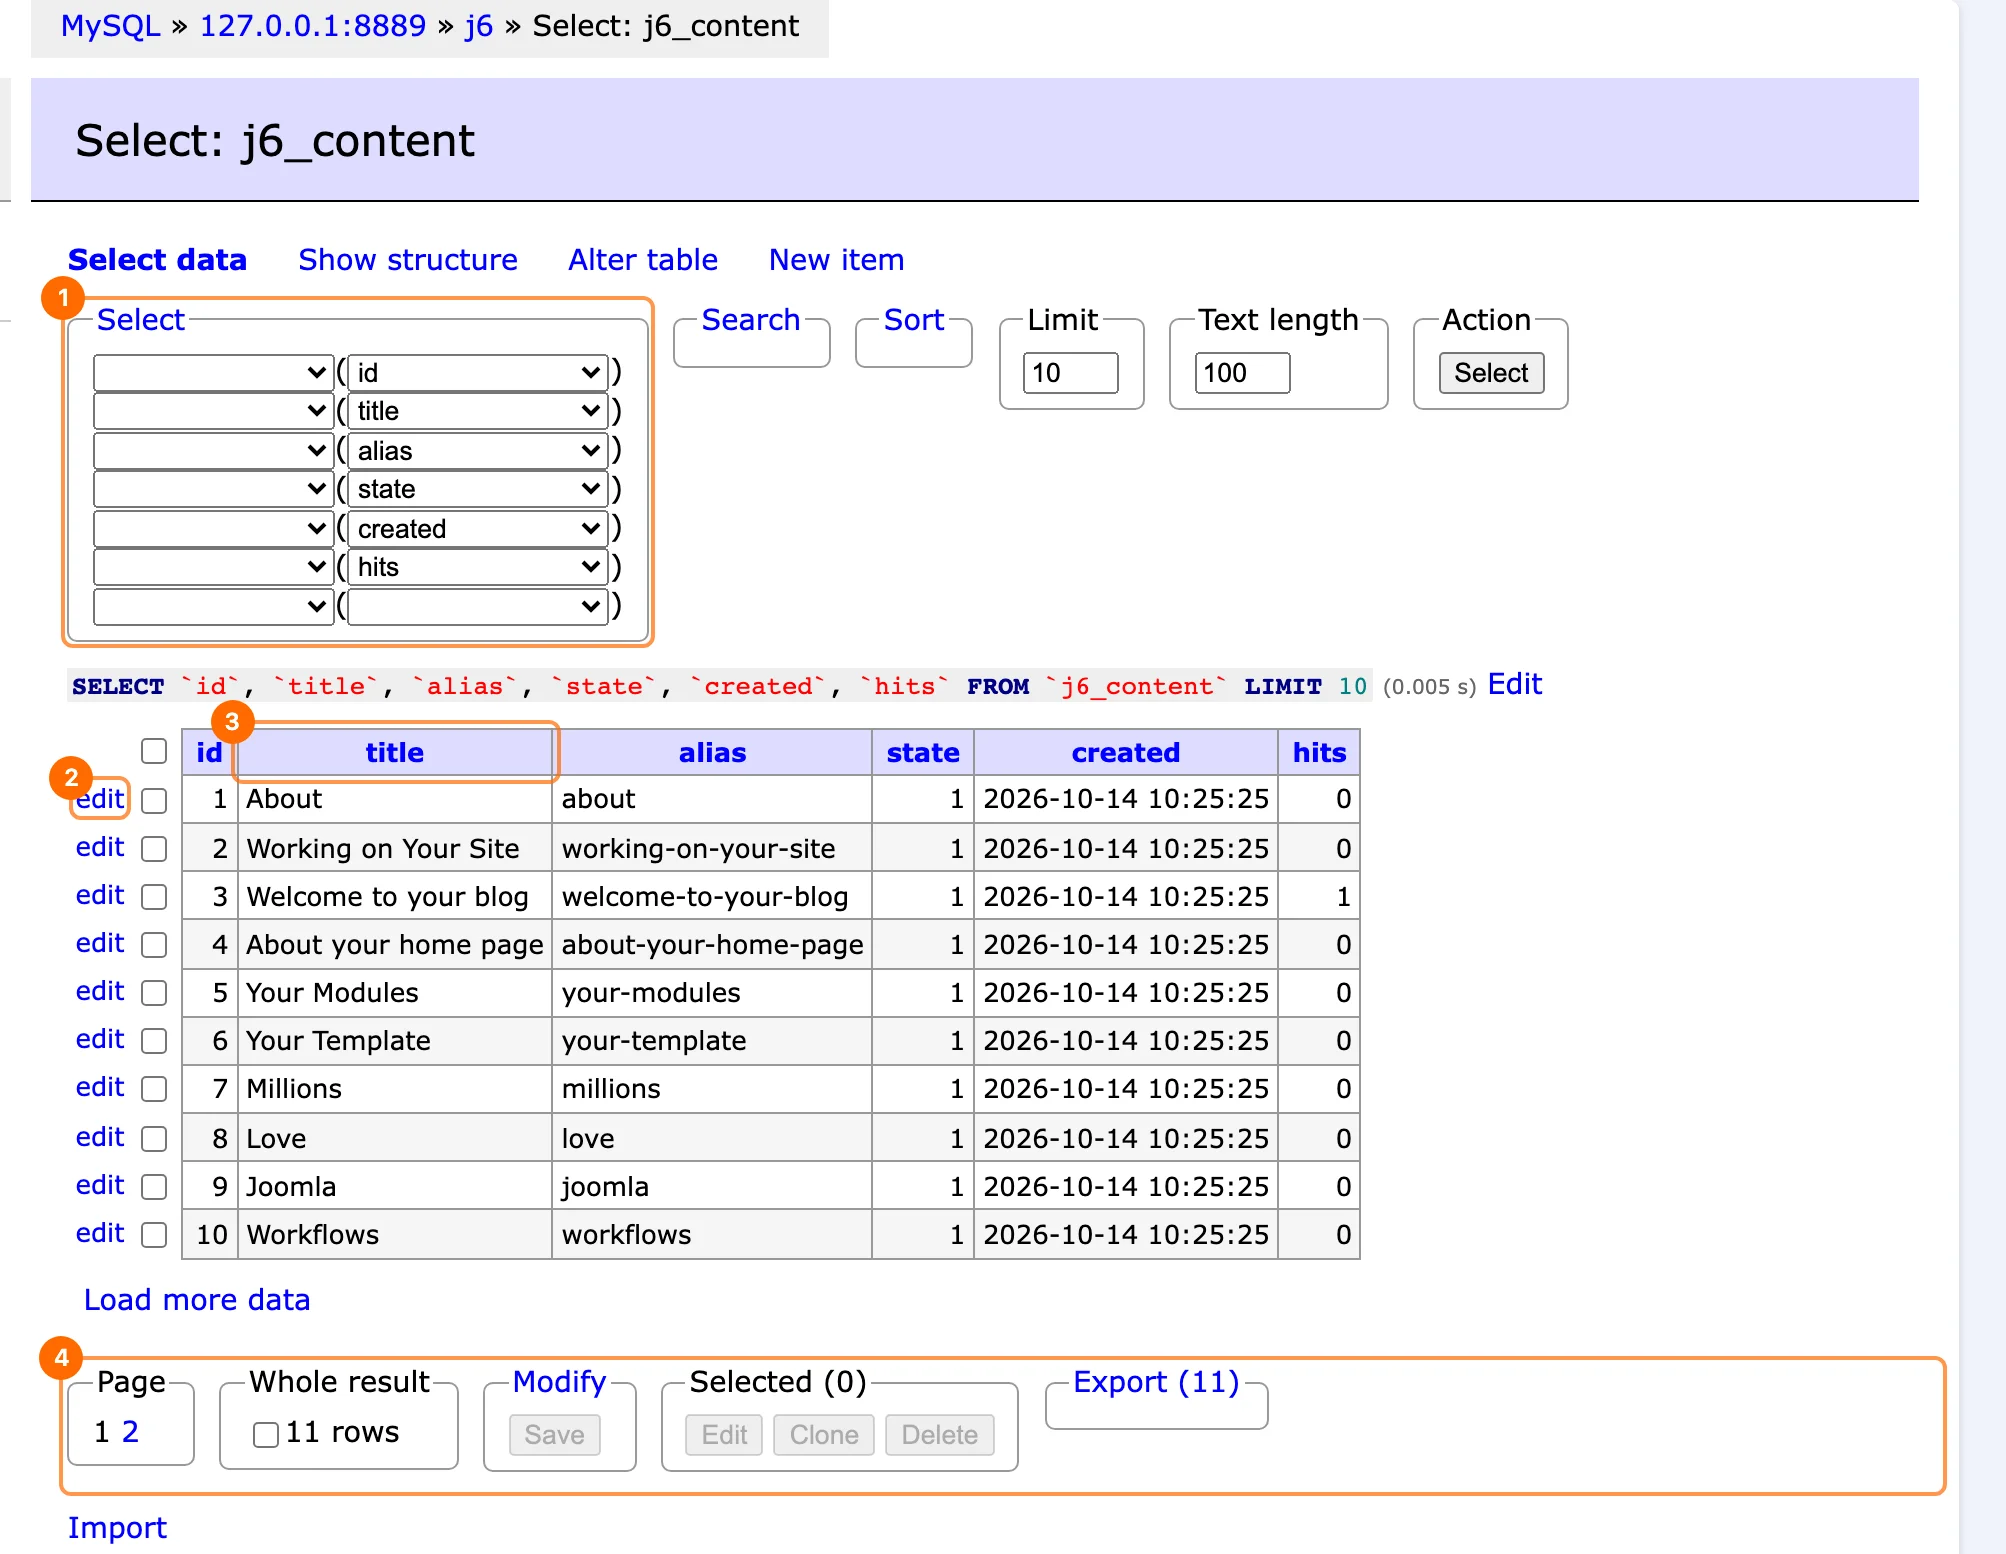
#__content, limited to a few columns.- 1Select, Search, Sort, Limit: choose columns, filter rows (for example title LIKE %joomla%), sort and set how many rows to show. Click Select to apply.
- 2edit: open a row in the edit form.
- 3Column header: click to sort by that column.
- 4Footer: pages, the total row count, inline Modify, actions for the selected rows (Edit, Clone, Delete) and Export of the result.
Tip: Ctrl-click (⌘-click on a Mac) a value to edit it right in the table, then click Save in the Modify box.
Edit, add and delete rows
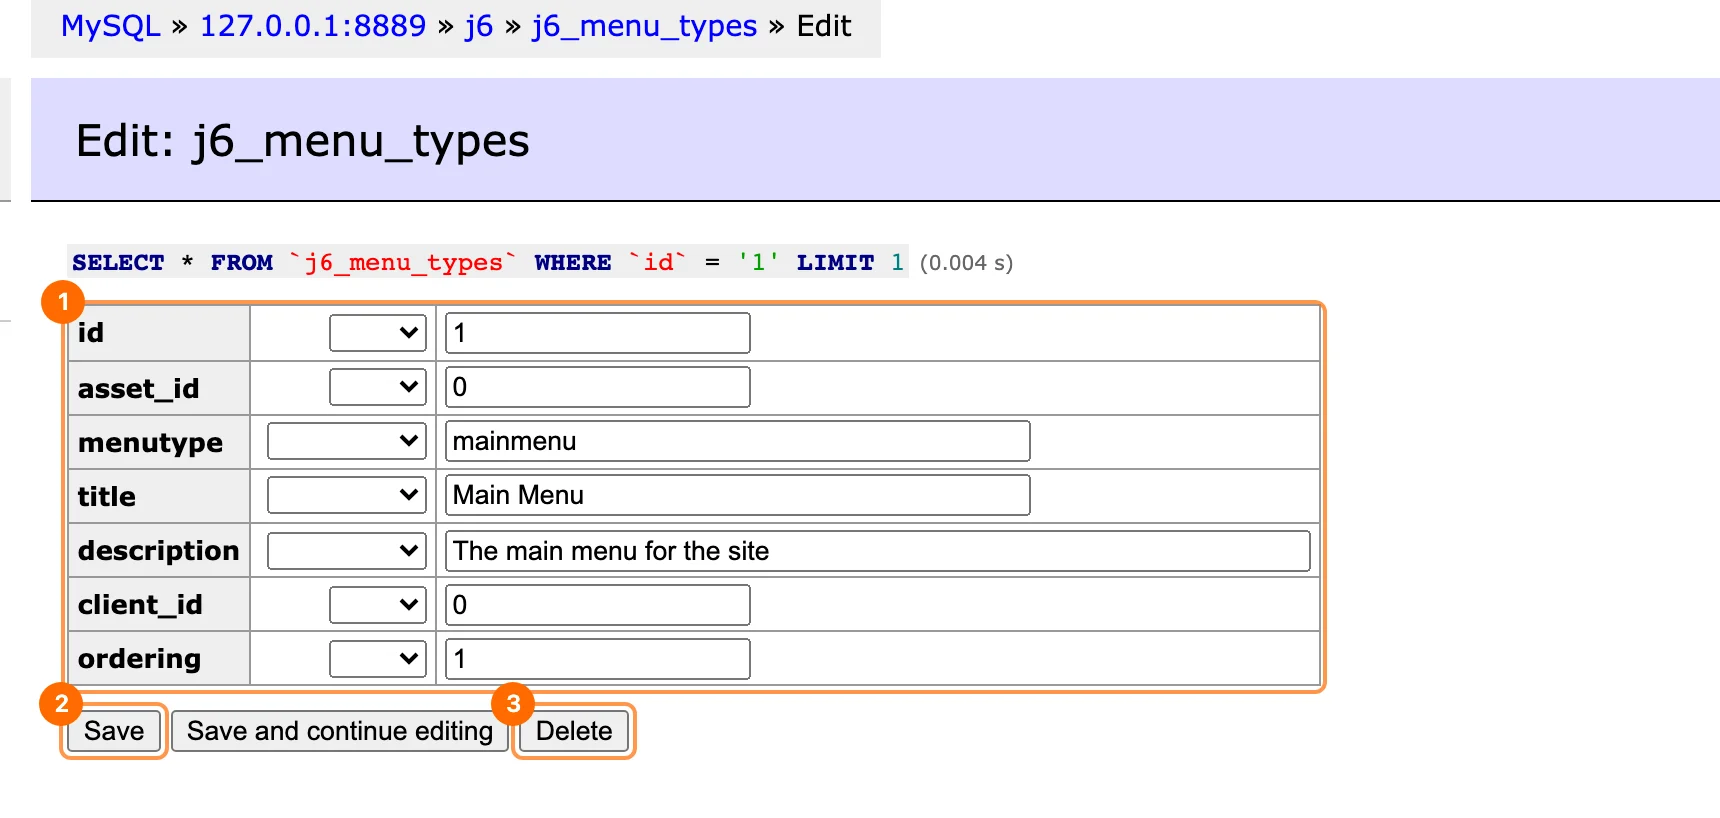
#__menu_types.- 1Fields: one line per column. The list before a value applies a function, such as
NOW()ormd5, or sets the value toNULL. - 2Save: save and go back to the list. Save and continue editing keeps the form open.
- 3Delete: delete this row after a confirmation.
To add a row, open a table and click New item.
Changes are written to your live database straight away and cannot be undone. Export the table or take a backup first, and avoid editing Joomla's own tables (users, assets, extensions) unless you know the effect.
SQL command
Click SQL command in the database menu, type one or more queries and click Execute.
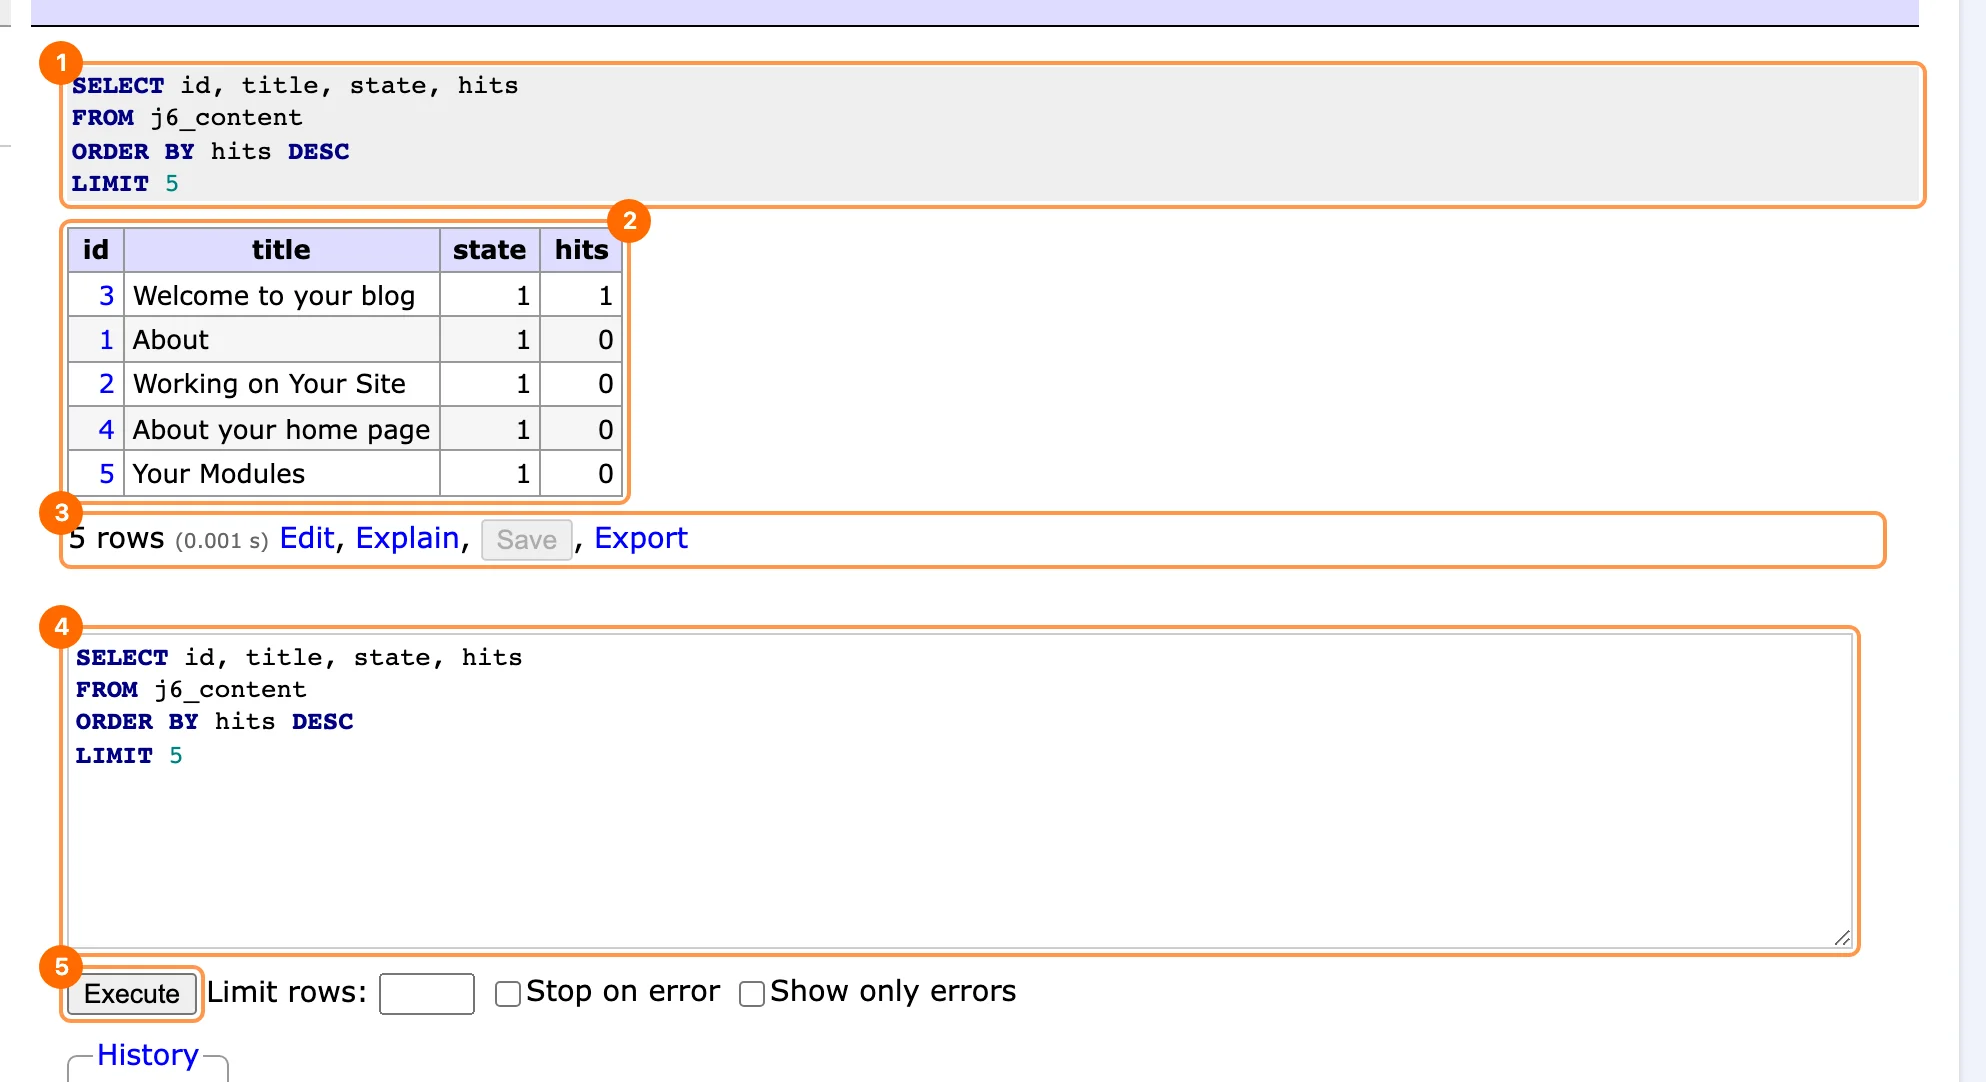
- 1Query: each query that ran, with syntax highlighting.
- 2Results: the rows the query returned.
- 3Row count and actions: time taken, Edit the query, Explain it or Export the results.
- 4Editor: write SQL here. Separate several queries with
;. - 5Execute: run the queries. Stop on error stops at the first failing query.
PX Adminer shows the real table names. Joomla writes them as #__content in code; on your site they start with your own prefix, such as abc12_content. History under the editor lists the queries you ran in this session.
Export
Click Export in the database menu to back up tables or the whole database.
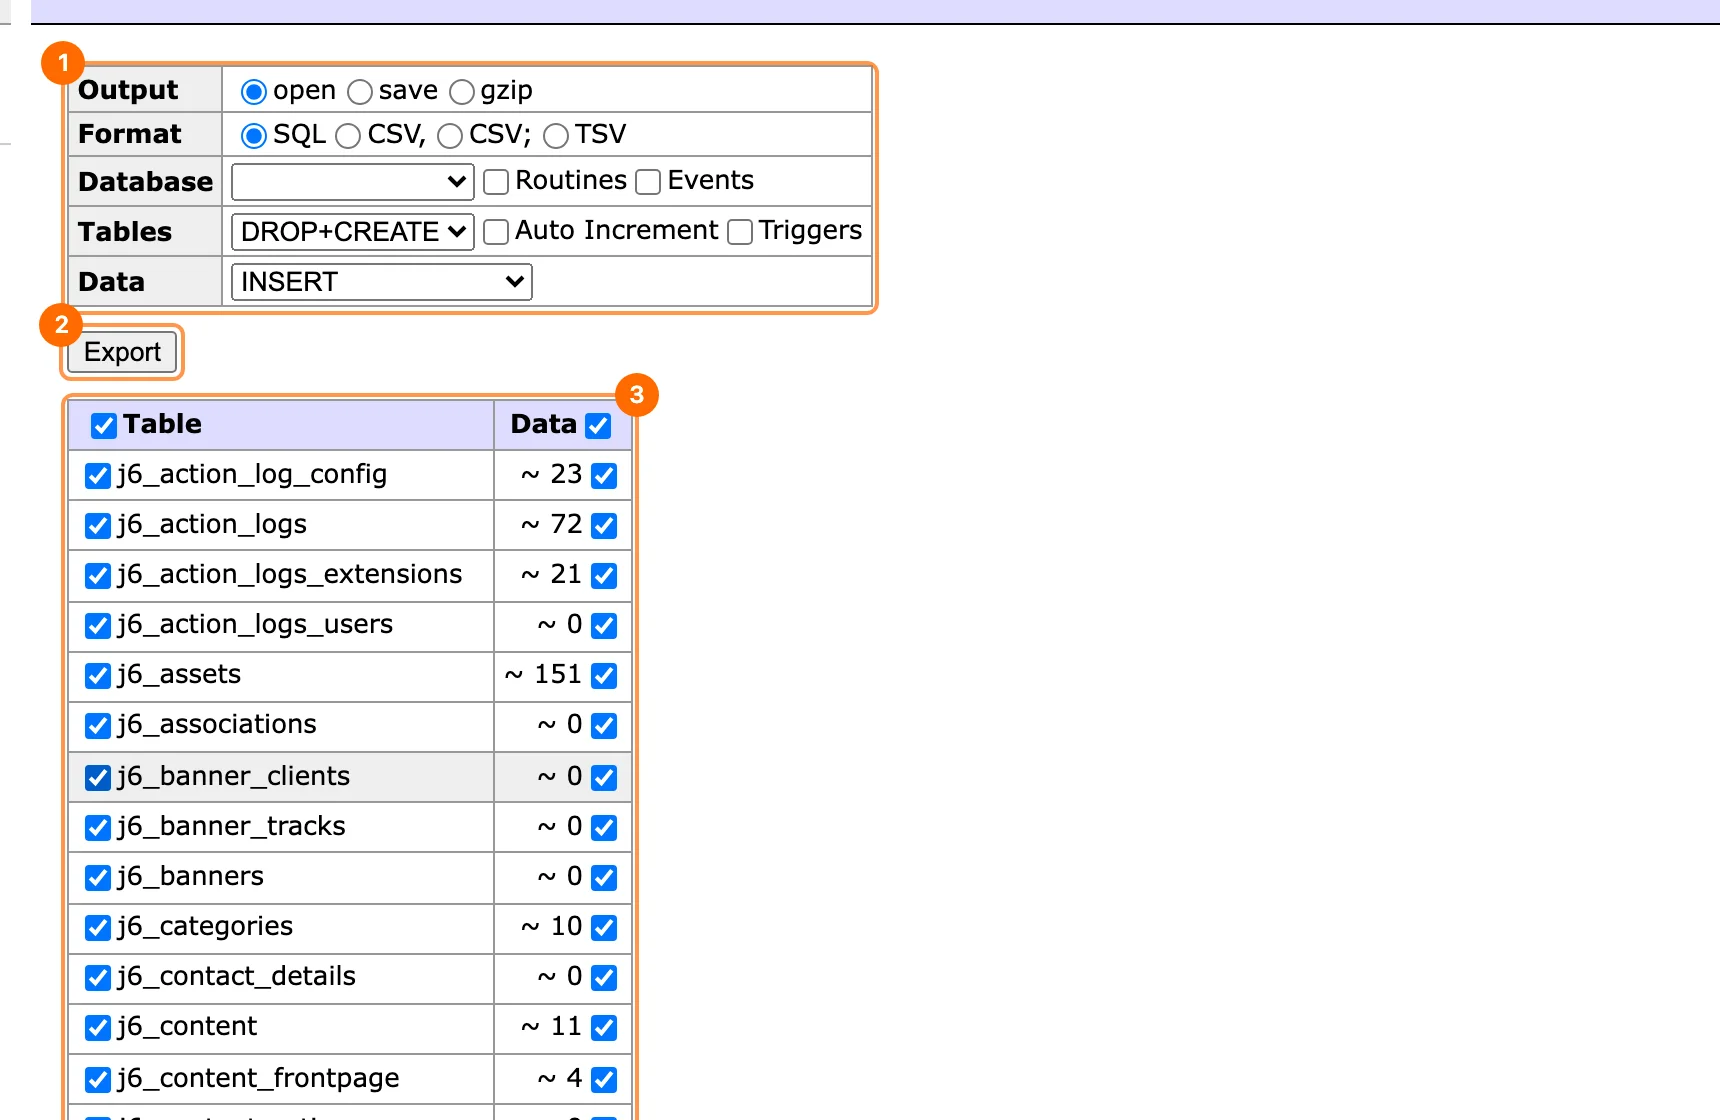
- 1Options:
- Output: open shows the result in the browser, save downloads a file, gzip downloads a compressed file.
- Format: SQL for a backup you can import again, CSV or TSV for spreadsheets.
- Tables and Data: what to write for each table, for example
DROP+CREATEandINSERT.
- 2Export: create the export.
- 3Tables: untick tables you don't need. The Data column exports the rows, without it only the structure is exported.
For a full backup choose gzip, SQL, tick all tables and their data.
Import
Click Import in the database menu.

- 1File upload: choose one or more
.sqlor.sql.gzfiles and click Execute. The PHP upload limit of your server applies. - 2From server: runs
adminer.sqloradminer.sql.gzfrom the PX Adminer folder on the server. Use it for files bigger than the upload limit.
An SQL file can drop and replace tables. Only import files you trust, and take a backup first.
Table structure
Open a table and click Show structure.
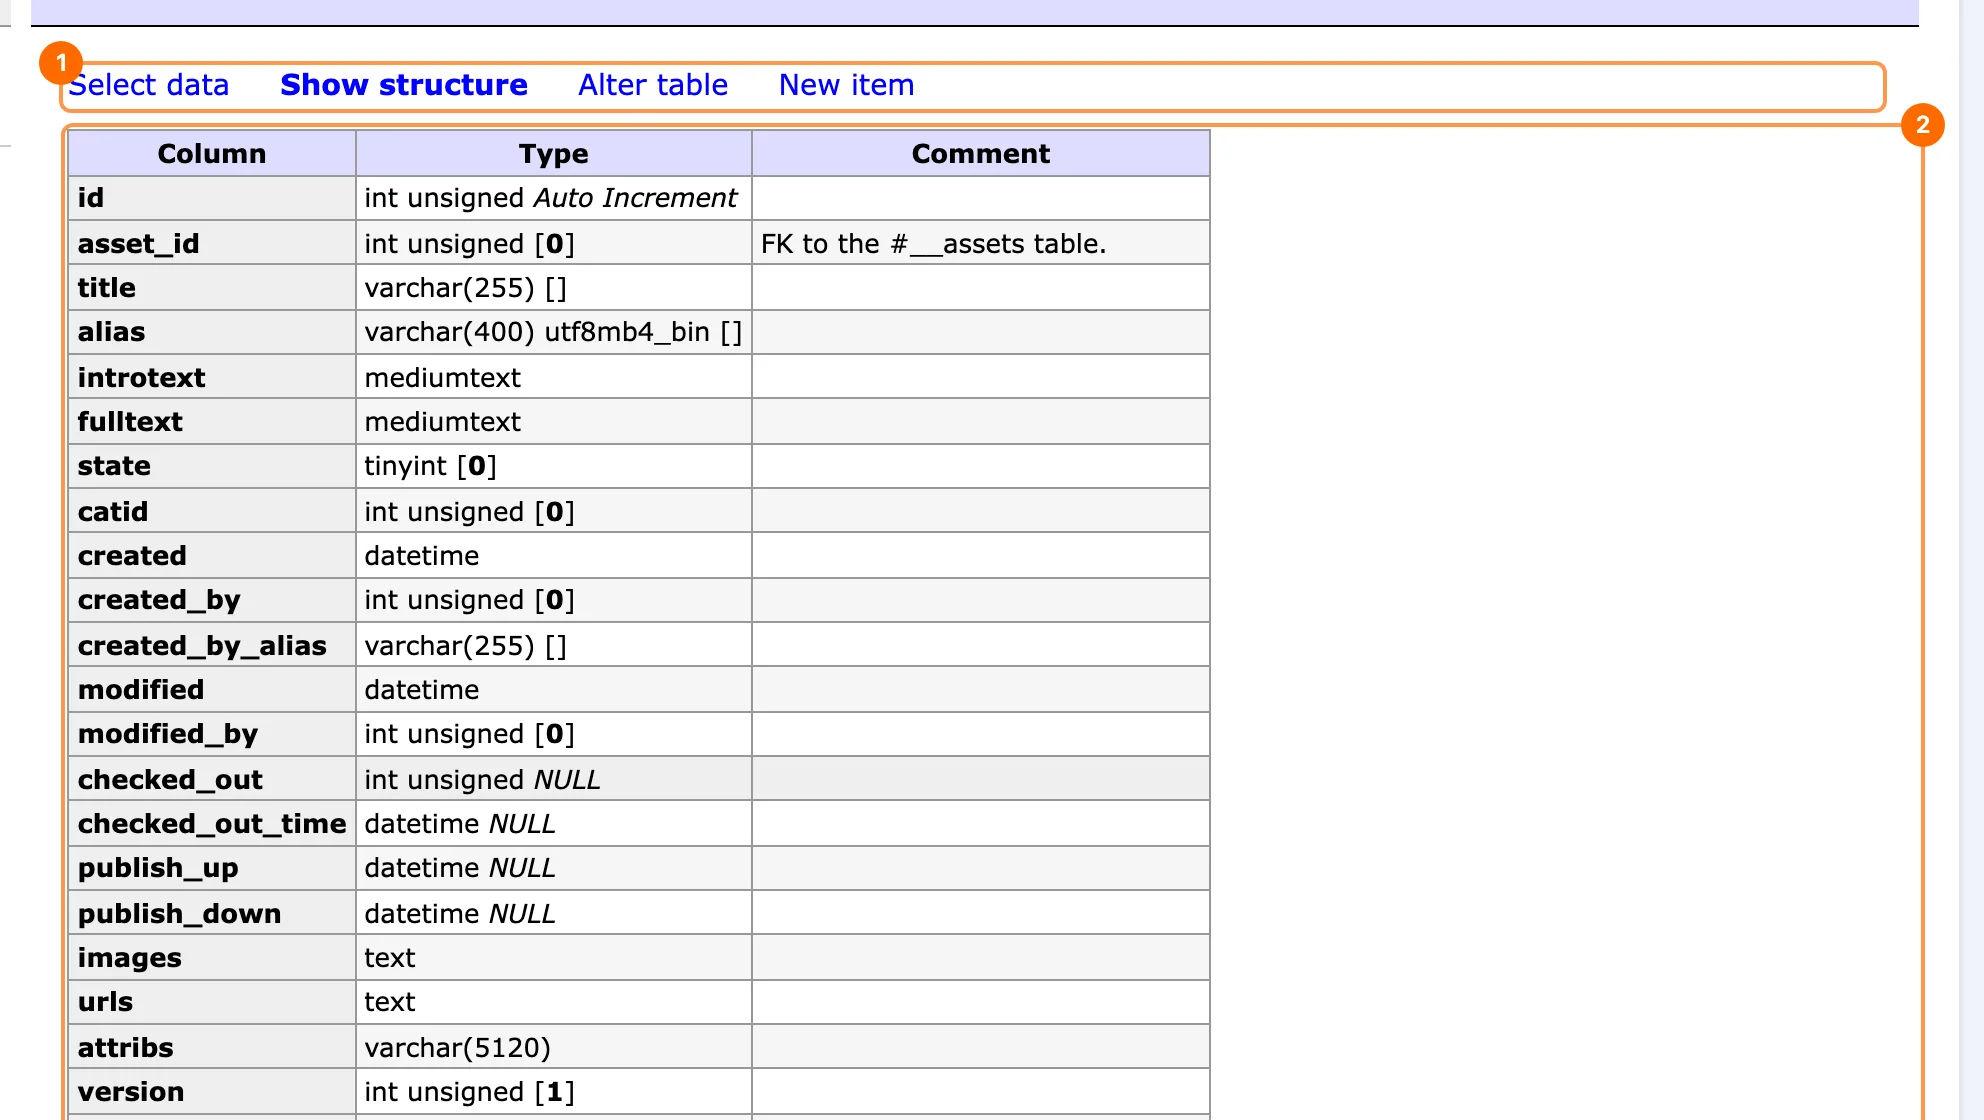
#__content.- 1Table links: Select data, Show structure, Alter table (add, change or remove columns) and New item.
- 2Columns: name, type, default value and comment. Below follow the indexes, foreign keys and triggers, each with a link to change them.
To create a new table, click Create table in the database menu.
Security
Full database access is enough to take over a site, so PX Adminer is locked down:
- Super Users only. Other groups, including Administrator, cannot open it, even if they get permissions in the component Options.
- No separate password. When you open the component, Joomla hands PX Adminer a one-time key that works once, for 60 seconds, and only in your browser.
- Tied to your Joomla login. Each page checks that your Joomla administrator session is still active and that your user is not blocked. Log out of Joomla and PX Adminer closes too. After two hours, open it again from the menu.
- Your database only. PX Adminer always uses the server, user and database from
configuration.phpand never offers a login form for another server. - Log. Every sign-in, and every rejected key, is written to
administrator/logs/pxadminer.phpwith time, IP address and user ID.
PX Adminer works with the permissions of your Joomla database user. If that user can see other databases on the same server, so can SQL commands in PX Adminer.
Troubleshooting
| Message | What to do |
|---|---|
| Your PX Adminer session has ended. | Your Joomla session expired, you logged out, or two hours have passed. Open Components → PX Adminer again. |
| Could not open PX Adminer. | The one-time key was already used or expired, for example after a page reload or a slow connection. Open the component again from the menu. |
| PX Adminer needs session metadata. | In Global Configuration → System, set Session Handler to Database or Track Session Metadata to Yes. |
| PX Adminer only supports MySQL and MariaDB. | Your site uses another database type (such as PostgreSQL), which PX Adminer does not support. |
| You don't have permission to access this. | You are not a Super User. Ask a Super User of the site. |
Credits & license
PX Adminer is free software released under the GNU General Public License version 2 or later. It includes Adminer, © 2007 Jakub Vrana, licensed under the Apache License 2.0 or GPL 2.